Importing variable products from CSV into WooCommerce is one of the most frustrating tasks store owners face. The process is notoriously difficult, with countless formatting requirements and hidden pitfalls that can derail your entire import. Even experienced developers struggle with the parent-child relationships, attribute mapping, and server limitations that make variable product imports such a challenge.
Countless store owners have told me they’ve wasted entire days trying to get their CSV files formatted correctly, only to encounter mysterious errors or broken variations. And the worst part? WooCommerce’s error messages rarely tell you what actually went wrong.
This guide provides a complete walkthrough of importing variable products into WooCommerce using CSV files. Whether you’re migrating from another platform or managing a growing catalog, I’ll show you exactly how to structure your data, avoid common mistakes, and troubleshoot the inevitable problems.
But more importantly, I’ll introduce you to Setary – a modern alternative that eliminates the CSV hassle entirely by turning your WooCommerce store into a live, editable variations spreadsheet.
What Are Variable Products in WooCommerce?
Variable products are WooCommerce products that offer multiple options for customers to choose from. Each variable product consists of a parent product and multiple child variations, creating a hierarchical structure that allows customers to select different combinations of attributes like size, color, or material.
Think of a t-shirt that comes in three colors and four sizes. Instead of creating twelve separate products, you create one variable product with twelve variations. The parent product holds the general information like the product name and description, while each variation stores specific data like individual prices, SKUs, and stock levels.
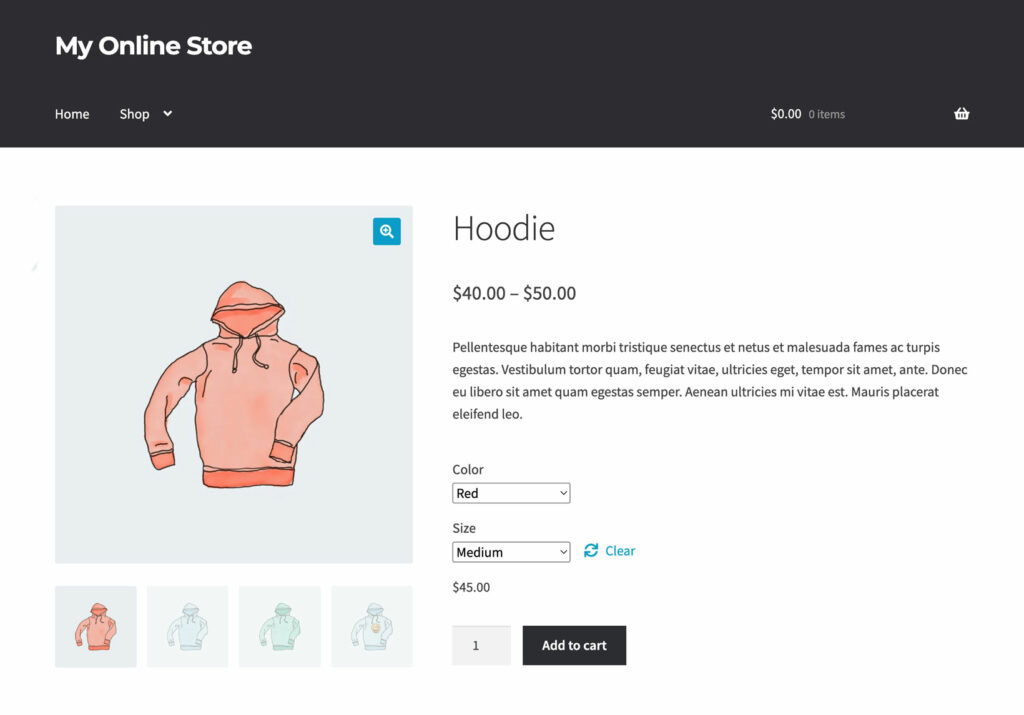
This parent-child relationship makes variable products powerful for customer experience but complex for data management. When customers visit your product page, they see dropdown menus or swatches for each attribute. Their selections determine which variation they’re purchasing, along with its specific price and availability.
Common use cases for variable products include clothing with size and color options, subscription services with different billing periods, digital products with various license types, and physical products with material or finish choices. Basically, any product where customers need to make selections before purchasing should be added as a variable product.
Importing Variable Products to WooCommerce
If you need to add lots of variable products or variations to your WooCommerce store, then CSV import is the obvious solution. I’ll show you how to do that next. However, don’t stop there because afterwards I’ll show you an even better method which avoids using the dreaded CSV files entirely 😉
Method 1: Importing WooCommerce Variations from CSV
Understanding the CSV Structure for Variable Products
The CSV import process for variable products differs significantly from simple products because of this complexity. Where a simple product needs just one row in your CSV import file, a variable product might need dozens – one for the parent and one for each possible variation. Getting this structure right is crucial for a successful WooCommerce variations import.
The CSV structure for variable products follows strict rules, which WooCommerce use to build parent-child relationships. You can prevent most common errors by understanding these rules before creating your import file.
Required CSV Columns for Product Variations Explained
Every variable product import requires specific columns that control how WooCommerce processes your data:
- Type – Must contain “variable” for parent products and “variation” for child products.
- SKU – Needs unique values for every row (duplicates cause imports to fail).
- Post_parent – Links variations to their parent using the parent’s SKU or database ID.
- Attribute columns – Use attribute_pa_[name] for global attributes, attribute_[name] for custom.
- Price fields – Parent rows must have completely empty price columns (not zero, just empty).
- Stock fields – Only variation rows should contain stock quantities.
The naming format for attributes catches most people out. Global attributes created in Products → Attributes use the “pa_” prefix, while custom product-specific attributes don’t. Getting this wrong is the most common import error I see.
Step-by-Step: Preparing Your CSV File of Product Variations
Creating a properly formatted CSV file requires careful preparation. The setup work before touching the CSV determines import success for your WooCommerce variations.
Setting Up Global Attributes First
Before creating your CSV, you must add global attributes in WooCommerce:
- Navigate to Products → Attributes in WordPress admin.
- Create each attribute your products use (size, color, material, etc.).
- Note the slug carefully – “size” becomes “attribute_pa_size” in your CSV.
- Add all possible terms – WooCommerce won’t create new terms during import.
- Enable “Used for variations” for attributes that create product options.
The attributes in your variations CSV file must exactly match the ones in your WooCommerce store. For example, if your Size attribute has “S, M, L, XL” as terms, then using “Small, Medium, Large, Extra Large” in the CSV will fail.
Creating Your Product Variations CSV Template
Start by getting a copy of a correctly formatted WooCommerce CSV file containing product variations. You can do this by exporting your existing products and variations via Products → All Products → Export. This provides the correct column structure so you can copy it as needed.
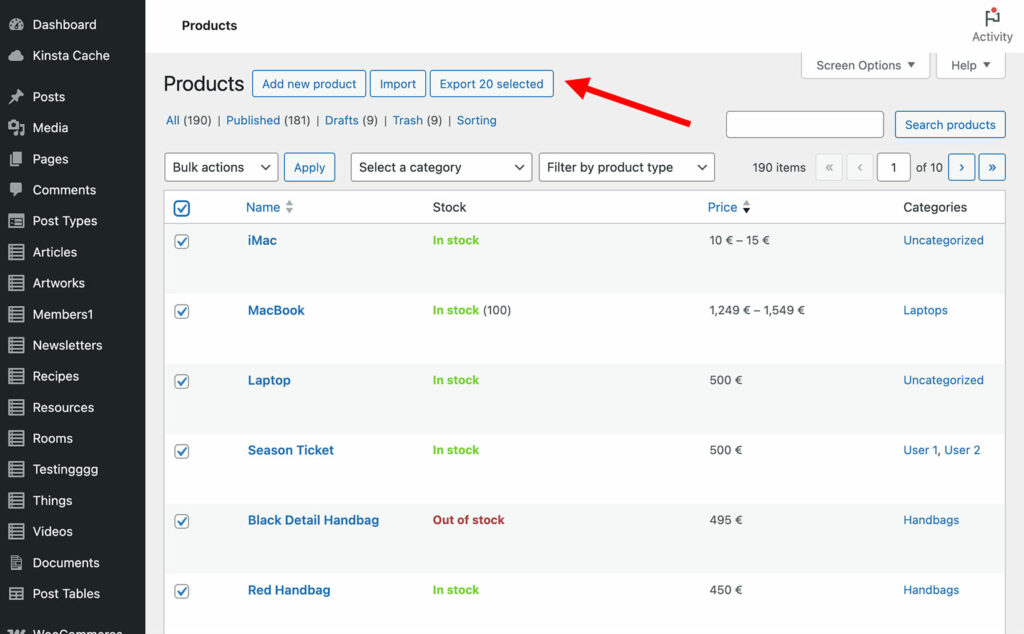
To keep things simple, I recommend only exporting the columns of product data that you actually need to the CSV:
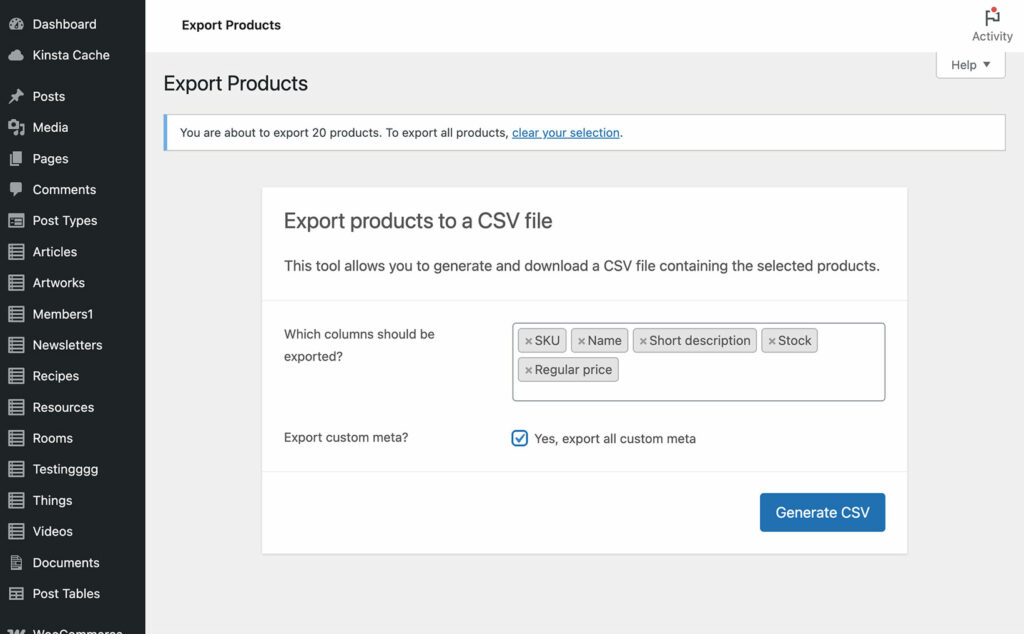
Typical data columns for variable products include: Type, SKU, Name, Post_parent, Published, Short description, Description, Tax status, In stock, Stock, Regular price, Sale price, Categories, Tags, Images, and all attribute columns. However, you only need to include the ones you actually plan to use.
Data Entry Best Practices
Critical Formatting Rules
- Use Google Sheets rather than Excel (Excel tends to breaks formatting).
- Prices must use periods for decimals, not commas.
- Categories use > for hierarchy: “Clothing > Men > Shirts”.
- Multiple values separate with commas.
- Save as UTF-8 encoded CSV.
- For parent product rows, set the type to “variable” and leave the price and stock columns completely empty.
- For variation rows, set the type to “variation” and make sure each one has a unique SKU. Also set the Post_parent to the parent product’s SKU. Make sure you add a value for every attribute column which applies to that variation.
- Order your rows logically with the parent product first, then all its variations, then the next parent and its variations. This sequential organization allows WooCommerce to process the variation relationships correctly.
How to Import Variable Products into WooCommerce
Once your CSV is formatted, the WooCommerce variations import process requires careful attention to mapping and settings.
Method 1: Single-File Import
- Navigate to Products → All Products and click Import.
- Choose your CSV file and click Continue.
- Verify the column mappings – e.g. the attribute_pa_size should map to “Attribute: Size” not “Size”.
- Leave “Update existing products” unchecked for new imports.
- Click Run the Importer and watch the progress bar. WooCommerce processes in batches of 30 rows. Note any errors for troubleshooting. Small imports complete within minutes, whereas larger files take longer.
Method 2: Two-Stage Import Process
For large catalogs, import the parent products first and then the variations:
- Filter your CSV to show only Type=”variable” rows.
- Import this file to create product frameworks.
- Then filter for Type=”variation” rows and import separately.
This method provides better error handling. If the variations import fails, the parent products remain intact. You can then troubleshoot and retry variations without starting over.
Post-Import Verification
Check products and their variations immediately after the CSV import. As part of this:
- Verify the variation dropdowns appear on the front end with all options.
- Select some variations and ensure they are purchasable (i.e. the add to cart button is not greyed out).
- Test price updates when selecting different combinations.
- Edit imported products to confirm attributes show “Used for variations” enabled.
- Test the complete purchase flow to reveal SKU, stock, or pricing issues.
Common CSV Import Problems and Solutions
Even with careful preparation, imports often fail. Understanding common issues saves hours of frustration.
The Top 5 Import Failures
Missing attribute terms – WooCommerce cannot create terms during import.
Solution: Add all terms in Products → Attributes before importing.
Price data on parent rows – Parent products need completely empty price columns.
Solution: Leave price fields blank, not zero.
Incorrect Post_parent – Breaks parent-child relationships.
Solution: Use parent’s SKU consistently in Post_parent column.
Wrong attribute format – Global attributes need attribute_pa_name format.
Solution: Check column headers match WooCommerce attributes exactly.
Server timeouts – Large imports exceed execution limits.
Solution: Break imports into 100-200 product chunks or increase PHP limits.
Debugging Import Errors
Enable debug mode in wp-config.php to get detailed error logs. Once you’ve done that, test the variations import with 2-3 products first to identify structural problems. You can then check WooCommerce → Status → Logs for specific errors.
When variations don’t display, make sure “Used for variations” is enabled on the ‘Edit Product’ screen and that attribute values match exactly – case sensitivity matters.
Performance Optimization Tips
Different hosting environments handle imports differently. Shared hosting often struggles with files over about 500 products, while dedicated servers or good quality managed WordPress hosts can handle thousands. Test incrementally larger imports to find your limit.
Whatever your hosting is like, keep things simple to reduce server load. For example:
- Remove unnecessary columns from import files.
- Delete unused fields rather than leaving them empty – fewer columns mean faster processing.
- Perform imports during low-traffic periods to avoid timeouts.
- Consider WP-CLI for large imports if you have command line access.
- Prepare your database before large imports by running optimization queries. This can include:
- Clearing transients and expired data that slow processing.
- Disabling unnecessary plugins during import to free resources.
- Monitoring server logs during imports to catch issues early.
If imports consistently fail, then upgrading your hosting plan might be the most cost-effective solution rather than spending hours working around limitations.
Why CSV Imports Fail for Complex Variable Products
There are several common reasons why CSV imports of variable products often fail. The issues tend to get worse the more your product catalog grows.
Technical Limitations
Server constraints create invisible import ceilings. Most hosting limits PHP execution to 30-60 seconds, but importing 1,000 variable products needs 10+ minutes. Memory limits cause similar failures.
WooCommerce provides no real-time validation during CSV preparation. You discover errors only after import attempts fail.
The WordPress database structure that stores variable products is complex. It involves multiple tables with foreign key constraints. CSV imports must populate these correctly in order. One formatting error cascades into multiple problems.
Workflow Inefficiencies
The export-edit-import cycle wastes hours on routine updates. Version control becomes impossible when multiple team members work with CSV files. Who has the current version? Will imports overwrite recent changes?
After importing, bulk editing requires starting the entire cycle again. Need to increase prices by 10% for one category? Export everything, edit in spreadsheet, hope you don’t break anything, and import again. This workflow doesn’t scale for stores that need frequent updates.
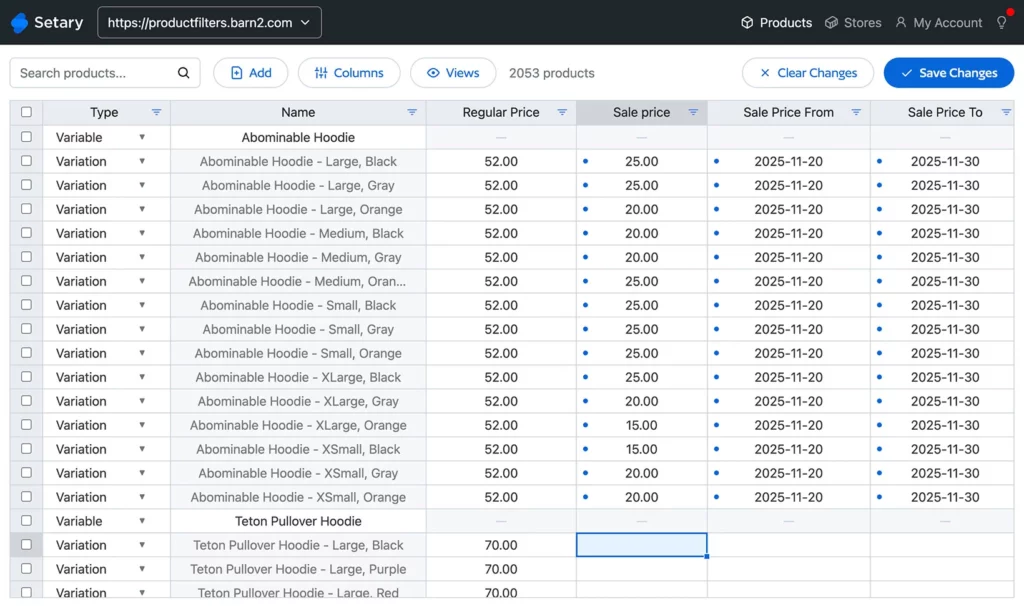
Method 2: Add Variations via Setary’s Live Spreadsheet Editor
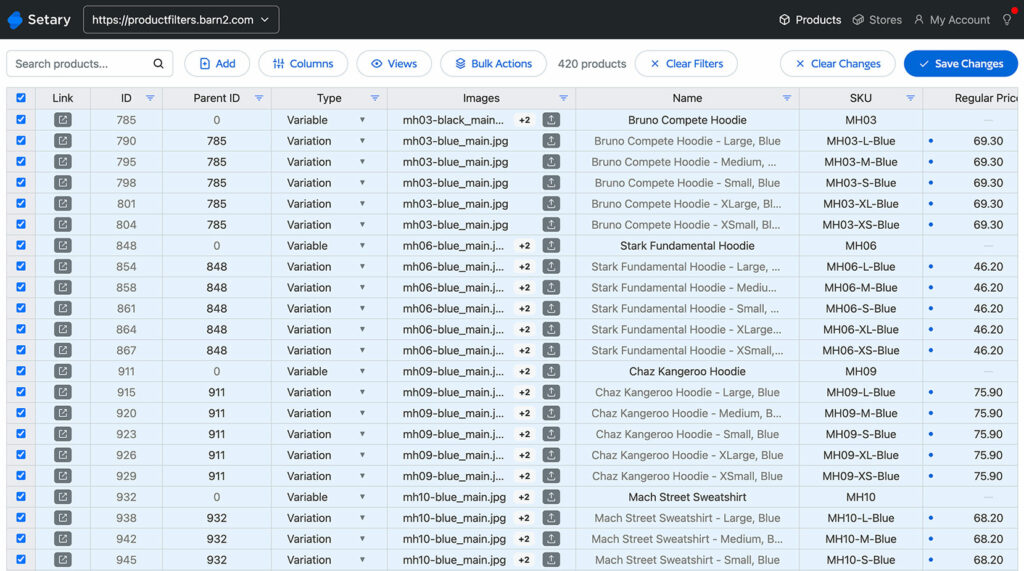
Setary transforms WooCommerce product management by eliminating CSV imports entirely. Instead of the export-edit-import cycle, Setary provides a live spreadsheet interface directly connected to your store’s database.
How Setary Eliminates CSV Hassles for Product Variations
While Setary does provide an “Import” button where you can upload WooCommerce variations from CSV, most stores don’t need to use this. That’s because Setary provides a much easier alternative to importing variations – displaying them directly in a bulk variations editing spreadsheet.
You see, the problem with CSV files is that they don’t auto-sync with your WooCommerce database. That’s why you have the headache of exporting and importing them between your computer and WooCommerce. Setary completely avoids this by displaying your products and variations in a spreadsheet which does sync with your live store. As a result, you can:
- Instantly bulk edit all your existing products and variations – either inline within the spreadsheet, or by selecting multiple products and applying bulk actions (e.g. “Increase all prices by 10%” or “Set stock levels to 50”).
- Create a new row – or duplicate an existing one – to quickly add new products and variations.
This last point is the key – to create a new product variation, just clone an existing one and edit the data as needed. This is just as easy as adding a new variation to a CSV file, but you don’t have to then import it to WooCommerce. Just click “Update” and the new variations will instantly go live on your store 🚀
Why Setary is Better Than CSV Imports
Direct database editing means your changes apply instantly without any import process. When you update a price in Setary’s spreadsheet, it immediately updates in WooCommerce. No formatting requirements, no column mapping, no server timeouts – just direct, immediate updates that work every time.
Real-time validation prevents the errors that plague CSV imports. Setary already knows your attribute terms, SKU requirements, and data relationships.
The visual parent-variation relationship makes it much easier to manage complex products that have many variations. Parents and variations appear in a clear hierarchy where you can see all related products at once. This visual organization alone saves hours compared to scrolling through CSV rows trying to track relationships.
Instant bulk updates replace the tedious import process for routine changes. Filter products by any criteria – category, tag, attribute, price range – and apply updates immediately.
Creating Variable Products in Setary
Adding variable products in Setary feels natural if you’ve ever used Excel or Google Sheets:
- Start by creating your parent product in a new row, setting the product type to “variable”. Add your basic information like name, description, and categories directly in the spreadsheet cells.
- Apply attributes across multiple products simultaneously using the spreadsheet interface. Copy attribute values from one product to another using familiar spreadsheet commands. Set up one product perfectly, then replicate its structure across your entire catalog. The fill-down feature applies attributes to hundreds of products at once.
- Bulk pricing adjustments for variations work beautifully in Setary. Filter to show all Medium-sized variations across your clothing catalog, then apply a $2 price increase to reflect higher material costs. Or select all variations of a specific color that’s being discontinued and apply a 30% discount. These targeted updates would require complex CSV manipulation but take seconds in Setary.
Advanced Features for Variable Products
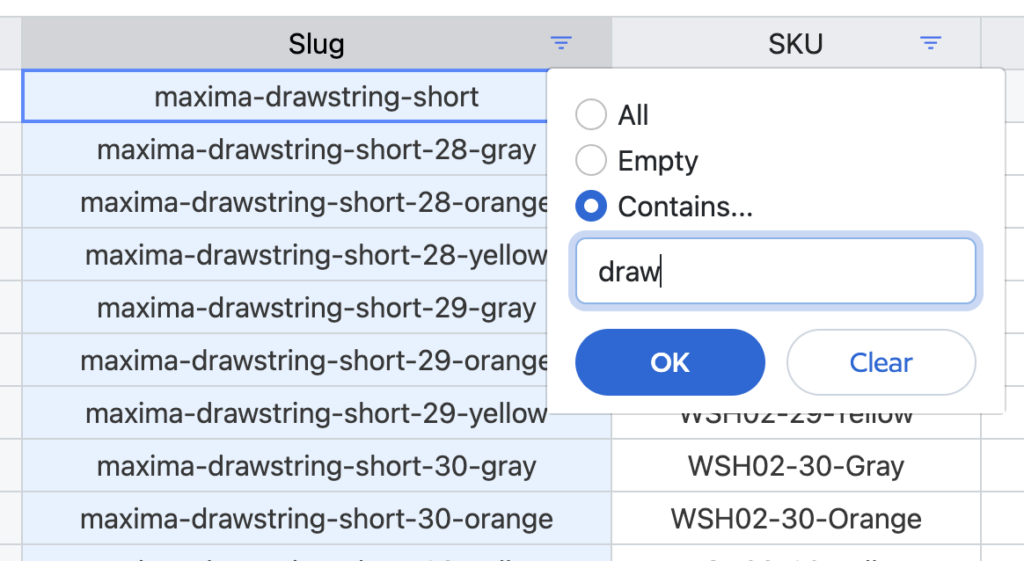
Filtering variations reveals powerful management capabilities. Show all Large-sized products that are low on stock, or find all Blue items priced under $50. These filtered views become saved templates that you can return to instantly. Create a “Reorder needed” view showing variations with stock below 10, or a “Sale items” view for products with active sale prices.
AI-powered description generation saves hours of content creation. Select multiple variations and let Setary’s AI create unique, SEO-optimized descriptions based on their attributes. The AI understands product relationships and creates descriptions that highlight specific variation features while maintaining consistency across your catalog.
Multi-store synchronization solves complex inventory challenges. Manage multiple WooCommerce stores from one Setary dashboard, synchronizing products, prices, and stock levels across locations. Update a product once and push changes to all stores, or maintain different prices per location while sharing inventory data.
Custom field support extends beyond standard WooCommerce data. Third-party plugins often add fields for specialized data like supplier codes, warehouse locations, or compatibility information. Setary displays these fields as editable columns, eliminating the need to understand complex meta field structures in CSV files.
Time and Cost Comparison
The efficiency difference between CSV variation imports and Setary becomes clear when you measure actual time spent. Importing 100 variable products with 5 variations each via CSV typically takes 4-8 hours including preparation, import attempts, and error fixing. With Setary, the same task takes about 30 minutes.
Consider updating prices for Black Friday. The CSV method requires exporting, editing, re-importing, and troubleshooting – minimum 3-4 hours. In Setary, you filter, select, apply a discount, and save – total time: 5 minutes. These time savings multiply across every product management task, freeing your team to focus on growth rather than data entry.
Best Practices for Managing Variable Products Long-Term
Success with variable products requires strategic thinking beyond just getting data into WooCommerce. The decisions you make about structure and process determine whether product management becomes easier or harder as your catalog grows.
Attribute Management Strategy
Consistent naming conventions prevent confusion and errors as your catalog expands. Decide early whether sizes will be “S, M, L” or “Small, Medium, Large” and stick with that choice. Document these decisions for your team. Mixed conventions make filtering difficult and confuse customers who see inconsistent options across products.
Global attributes should be your default choice for any characteristic used across multiple products. They enable filtered navigation, integrate with search, and maintain consistency. Reserve custom attributes for truly unique product features that won’t repeat. Converting custom attributes to global later requires significant rework.
Archive pages for attributes create valuable landing pages for SEO and customer navigation. Enable them for attributes customers naturally shop by – color, size, brand, material. These pages can rank for searches like “blue dresses” or “leather bags” while providing focused shopping experiences. However, avoid archives for technical attributes that create thin content pages.
Consider the customer experience when structuring attributes. Group related options logically – don’t mix sizes and colors in one attribute. Order terms sensibly – sizes should flow from small to large, not alphabetically. These details seem minor but significantly impact conversion rates when customers can’t quickly find their options.
Inventory and Pricing Updates
Scheduled bulk updates reduce reactive scrambling and emergency fixes. Set weekly times for inventory updates based on supplier reports. Schedule seasonal price changes in advance rather than rushing them when sales start. This planned approach reduces errors and ensures consistent customer experience.
Track inventory at the variation level for accurate stock management. While WooCommerce allows product-level inventory, variation-level tracking prevents overselling specific options. Customers hate finding out their selected size is unavailable after purchase. Setary makes variation-level stock updates simple with filtered bulk actions.
Conclusion and Next Steps
Importing variable products from CSV into WooCommerce remains one of the platform’s most challenging tasks. Despite following every guideline perfectly, you’ll still encounter timeout errors, broken variations, and hours of troubleshooting. The strict formatting requirements, server limitations, and lack of real-time validation make CSV imports a frustrating necessity rather than an efficient solution.
Setary offers a fundamentally different approach that eliminates these pain points entirely. By providing direct access to your WooCommerce database through a familiar spreadsheet interface, Setary removes the import process altogether. Changes apply instantly, validation happens in real-time, and bulk operations that would take hours with CSV complete in minutes.
The efficiency gains extend beyond just time savings. When product management becomes quick and reliable, you can respond faster to market changes, test pricing strategies more easily, and maintain accurate inventory without dedicating entire days to updates. Your team can focus on strategy and growth rather than wrestling with CSV formatting.
Ready to transform how you manage variable products? Start your free trial of Setary today and experience the difference yourself.
The smartest way to bulk edit WooCommerce products
Try our demo now and see how you could save thousands of hours when managing your WooCommerce products.
or try the demo