WooCommerce product attributes are an essential part of most online stores. From offering different variations like sizes and colors to helping customers quickly filter and find the perfect product, mastering attributes is essential for running a professional, user-friendly ecommerce site.
In this complete guide, you’ll learn:
- What are WooCommerce product attributes.
- When to use attributes vs. custom fields or taxonomies.
- How to create and manage product attributes.
- An easy way to save time by bulk editing attributes using Setary.
- How to let customers find products by attribute with the WooCommerce Product Filters plugin.
- Ways to improve the display of attributes on product pages by styling variations as checkboxes, radio buttons or clickable image buttons using the WooCommerce Product Options plugin.
Let’s get started.
What Are WooCommerce Product Attributes?
In WooCommerce, product attributes describe the characteristics of a product. You can either use them to display extra data about a product, add product filters, or to create multiple options for customers to choose from.
Typical examples of product attributes in WooCommerce include:
- Size: Small, Medium, Large
- Color: Red, Blue, Green
- Material: Cotton, Polyester, Wool
- Dimensions: Height, Width, Depth
You can use product attributes for internal purposes, to create variations, or display them in an ‘Additional Information’ tab on the product page:
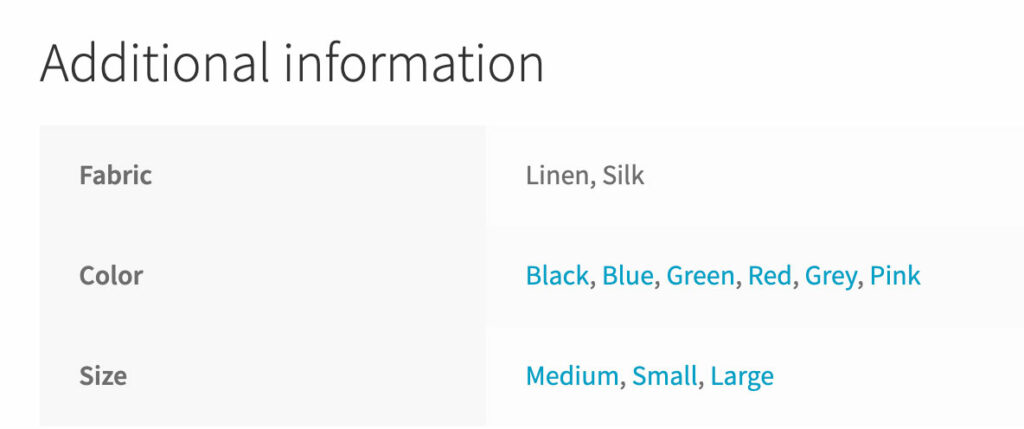
Good to know: In the above screenshot, the attributes which are used for variations are clickable, and non-variation attributes are not 💡
Types of WooCommerce product attributes
Lots of people don’t realize that there are actually two types of product attributes in WooCommerce:
- Global attributes: Created centrally and reused across multiple products. Great for standardization.
- Custom attributes: Created individually within a product. Best for one-off or unique characteristics.
It’s important to know the difference because custom/product-specific attributes are standalone. You can’t use them to group multiple products, for example so that customers can filter by attribute.
👉 Example:
Selling T-shirts? Create a global “Size” attribute with values S, M, L, XL.
Selling rare art pieces? Add a one-off custom attribute like “Year Created.”
Using product attributes correctly helps you to stay organized internally, and also improves customer experience on the front end.
However, there are other types of WooCommerce product data which you can use as an alternative to attributes. It’s useful to know what these are in order to choose whether product attributes are the best place for your data. I’ll tell you about these next.
When to Use Attributes vs. Custom Taxonomies or Custom Fields
Choosing the right tool for product data is crucial. Here’s a simple decision guide:
| Use This | When… | Example |
|---|---|---|
| Product Attributes | Customers must select an option OR you want filtering/search by that property | Color, Size, Material |
| Custom Fields | You need to store extra product data not intended for selection or filtering | SKU numbers, Supplier Info |
| Custom Taxonomies | You want ways to group products outside of Categories/Tags | Brands, Seasons, Product Series |
🔎 Example Breakdown:
- Attributes: Customer picks a color (Red, Green, Blue) for a hoodie.
- Custom Fields: Internal note about warehouse bin location.
- Taxonomies: A “Brand” taxonomy lets users browse by manufacturer.
I still don’t understand the difference!
Fair enough – there is a lot of overlap between WooCommerce product attributes, custom fields and taxonomies.
When in doubt, I’d recommend using product attributes. That’s because they’re already built into WooCommerce, whereas you need to use a plugin like Easy Post Types & Fields or ACF to create custom fields and taxonomies.
Another way to decide whether to use custom fields or taxonomies is if you want to separate them out from your product attributes in WordPress. For example:
- WooCommerce product attributes appear in the ‘Attributes’ tab of the ‘Product Data’ section of the product editor. (You can add them globally via Products > Attributes and then select them in the product editor.)
- Custom fields appear as standalone fields in the product editor, instead of within the ‘Attributes’ tab. This makes them easier to manage, away from your attributes.
- Custom taxonomies are similar to product categories in WooCommerce. They appear as hierarchical checkboxes on the right of the product editor.
Remember:
If you ever want customers to filter products based on a piece of information, use attributes or taxonomies — not custom fields.
How to Create and Manage Product Attributes in Core WooCommerce
WooCommerce’s built-in attribute tools are good — but can be clunky without the right workflow. First, I’ll tell you how to create WooCommerce product attributes the default way. After that, I’ll show you how to save time by creating them using Setary’s bulk editor.
Creating Global Attributes
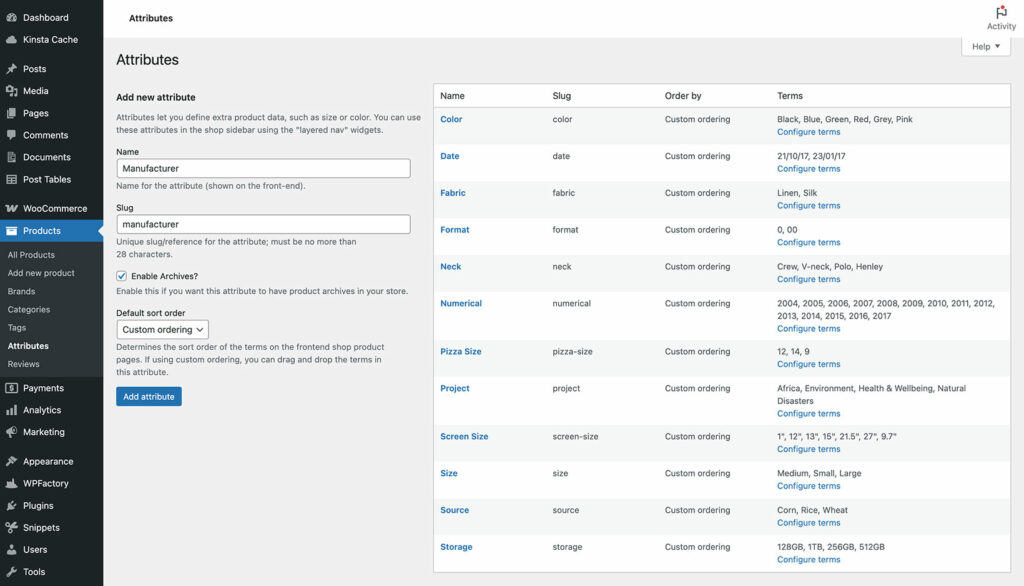
- Navigate to Products → Attributes.
- Enter a Name (e.g. Color).
- Customize the Slug (URL-friendly version).
- Decide whether to enable an archive page for the attribute. (This will allow customers to click on an attribute term to view a separate page listing all products with that term.)
- Click Add Attribute.
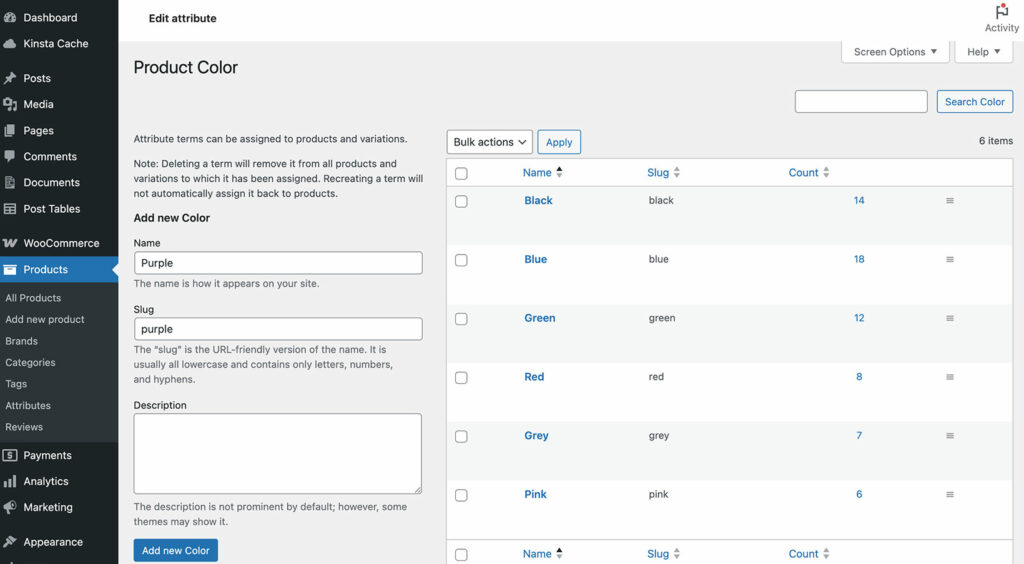
- After creation, click Configure Terms and add them (e.g., Red, Blue, Green).
🎯 Tip: Keep attribute names short, clear, and standardized.
Assigning Attributes to Products
- Open a product in the WordPress admin.
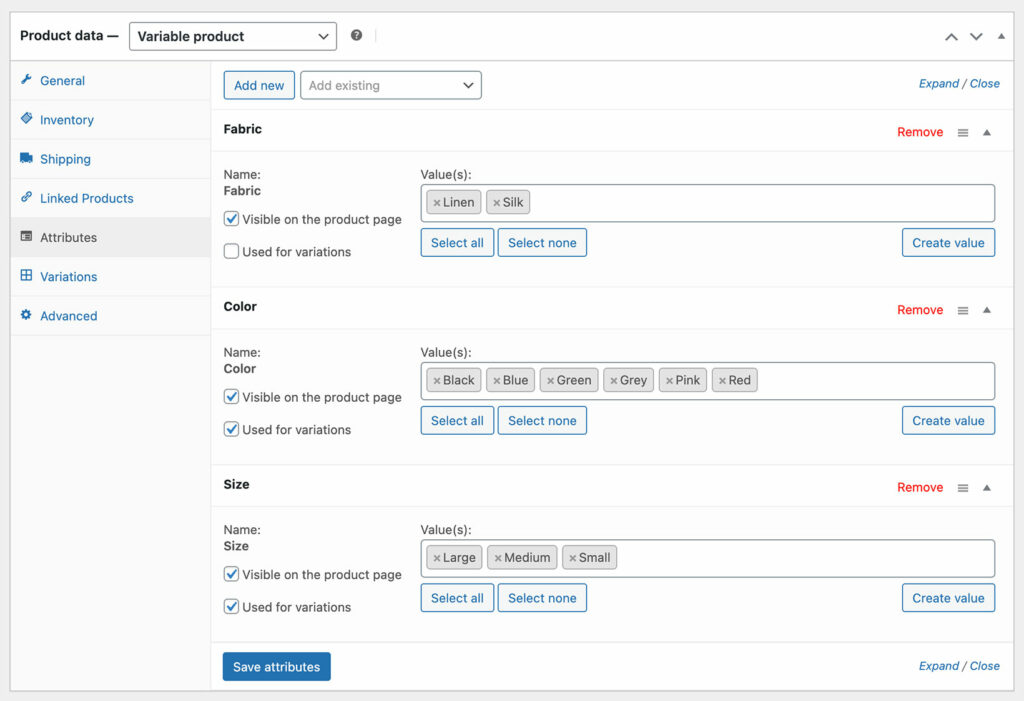
- Scroll to the Product Data → Attributes tab.
- Select a global attribute from the dropdown.
- Choose the attribute terms that apply to this product (e.g., “Blue” and “Large”).
- Optionally enable either or both of these checkboxes:
- Visible on the product page – Tick this to display the attribute name and its terms in the meta data section of the product page. For example, this might appear as “Color: Blue, Red”.
- Used for variations – Tick this if you want to use the attribute to create product variations for customers to choose from. For example, you might want to add a “Color” dropdown to the product page.
You can also create custom attributes on the fly for one-off needs. However, as I mentioned earlier, global attributes are better for consistency across your product catalog.
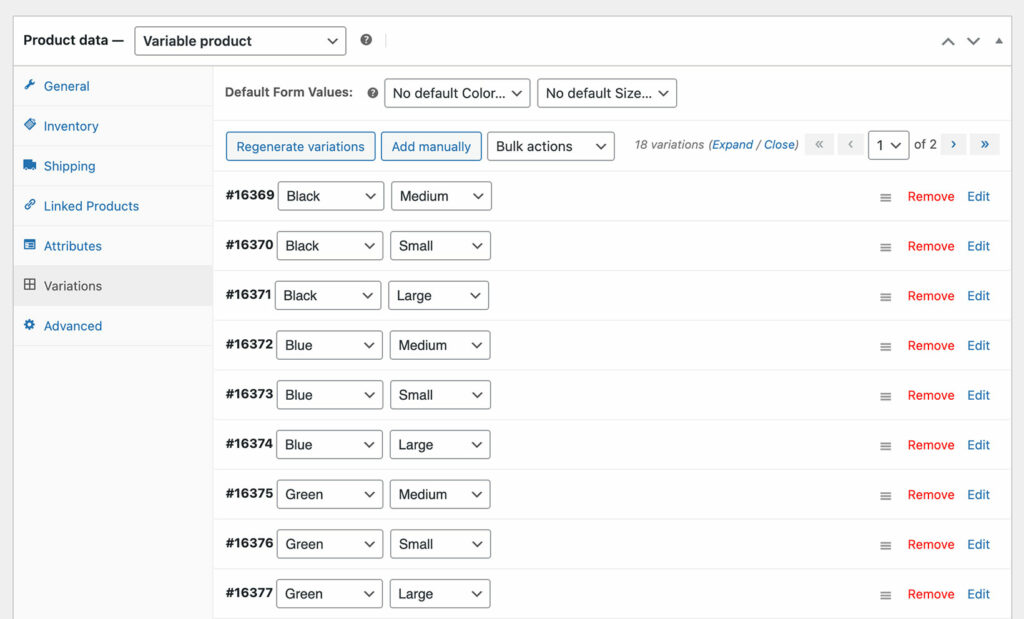
Using Attributes for Variations
- Switch the product type to Variable Product.
- Under Attributes, make sure to select “Used for variations.”
- Head to the Variations tab to create variations for each combination.
- Set specific prices, stock, and images for each variation. (Tip: If you need to create lots of variations then skip to the next section, as it’s much faster to add variations in bulk with Setary.)
👨💻 Example:
Create variations for a T-shirt with three colors and three sizes — 9 variations total.
The problem with Managing Attributes in Core WooCommerce
While WooCommerce allows basic attribute management, it quickly becomes overwhelming as your store grows.
- Bulk editing is painful: You can’t easily mass-apply attributes across hundreds of products.
- Human error creeps in: For example, typos or inconsistent use of terms.
- Slow onboarding: New team members struggle to apply attributes correctly without close training and oversight.
Imagine updating the “Material” attribute for 500 products manually — it’s slow, error-prone, and soul-destroying 😩
That’s why store owners often turn to bulk editing tools like Setary. I’ll tell you about this next.
How to Use Setary to Bulk Create and Edit Attributes
Setary is a purpose-built tool for managing products and their attributes in a spreadsheet-style editor. It’s perfect for fast WooCommerce attribute and product management.
Why Use Setary?
- See everything at a glance: Attributes are displayed as editable columns.
- Bulk create and edit: Apply attribute values to multiple products instantly.
- Prevent errors: Dropdowns for consistent term selection.
- Save time: No endless clicking between product pages.
The smartest way to bulk edit WooCommerce products
Try our demo now and see how you could save thousands of hours when managing your WooCommerce products.
or try the demo
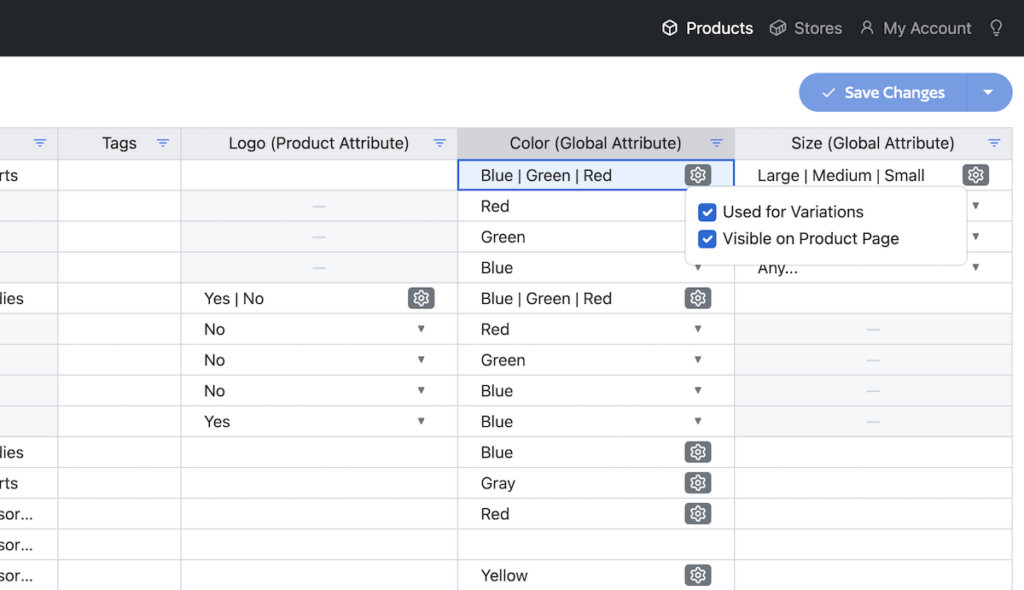
How to Bulk Manage Attributes in Setary
- Connect your WooCommerce store to Setary.
- The Setary spreadsheet editor will display each of your global attributes in a separate column.
- Use the search and filters to choose the products whose attributes you want to add/edit (e.g., by category or stock status).
- Scroll horizontally to the relevant product attribute column.
- Type, edit or select new attribute values.
- Save all changes in a single click.
💡 Pro Tip: Use the “Fill Down” feature to apply a WooCommerce product attribute across hundreds of rows quickly.
As you can see, Setary massively speeds up attribute management — while reducing errors and frustration.
Improve Findability: Filtering WooCommerce Products by Attribute
Having well-organized attributes is only half the battle. To help customers actually use them, you need powerful attribute filters.
WooCommerce comes with some basic attribute filters, which you can add via the widget editor in WordPress. However, these aren’t ideal and it’s better to use a purpose-built WooCommerce filter plugin.
Problems with Default WooCommerce Attribute Filters
- Full-page reloads every time a filter is clicked.
- Limited visual layouts (only dropdowns or checkboxes).
- Poor mobile experience: The sidebar is hidden or moved to the bottom for mobile users, so they can’t see the filters at all 😞
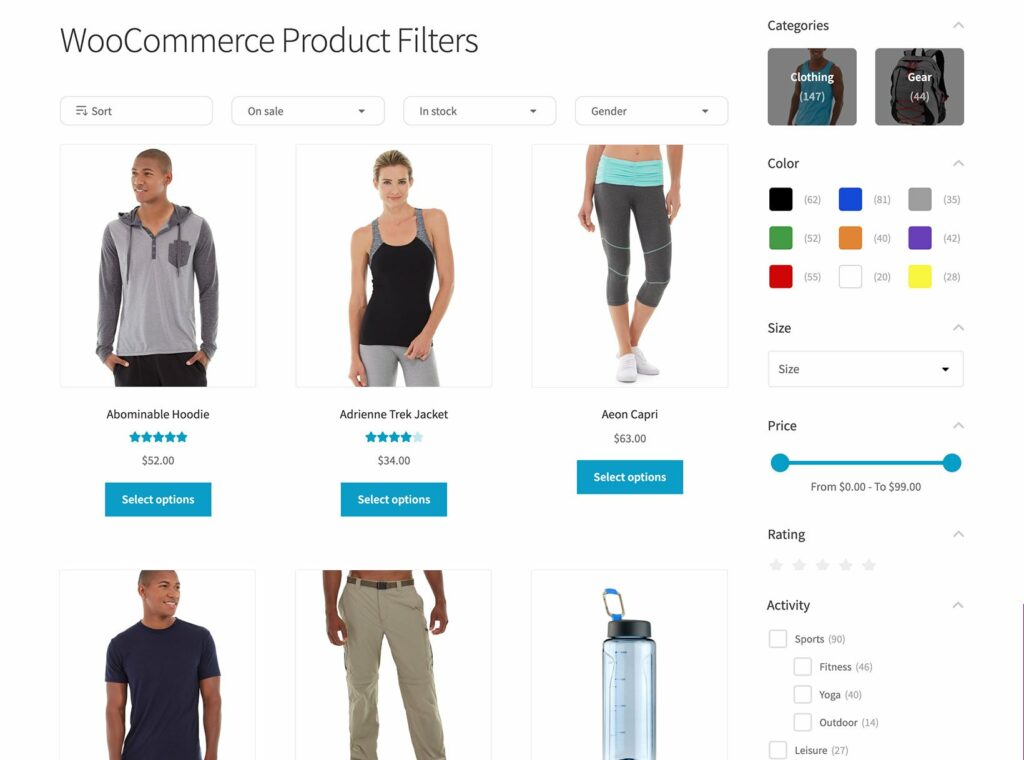
Why Barn2’s WooCommerce Product Filters Are Better
Barn2 have an excellent plugin called WooCommerce Product Filters. This adds professional level filtering to your store, allowing you to create better filters for attributes or any other type of product data.
It comes with:
- Instant Ajax filtering without page reloads.
- Customizable filter styles: Checkboxes, dropdowns, sliders, color swatches, clickable images, and more.
- Mobile-optimized with smart collapsible filter groups. Sidebar filters appear above the list of products for mobile users, ensuring they don’t miss out.
How to Set Up WooCommerce Attribute Filters
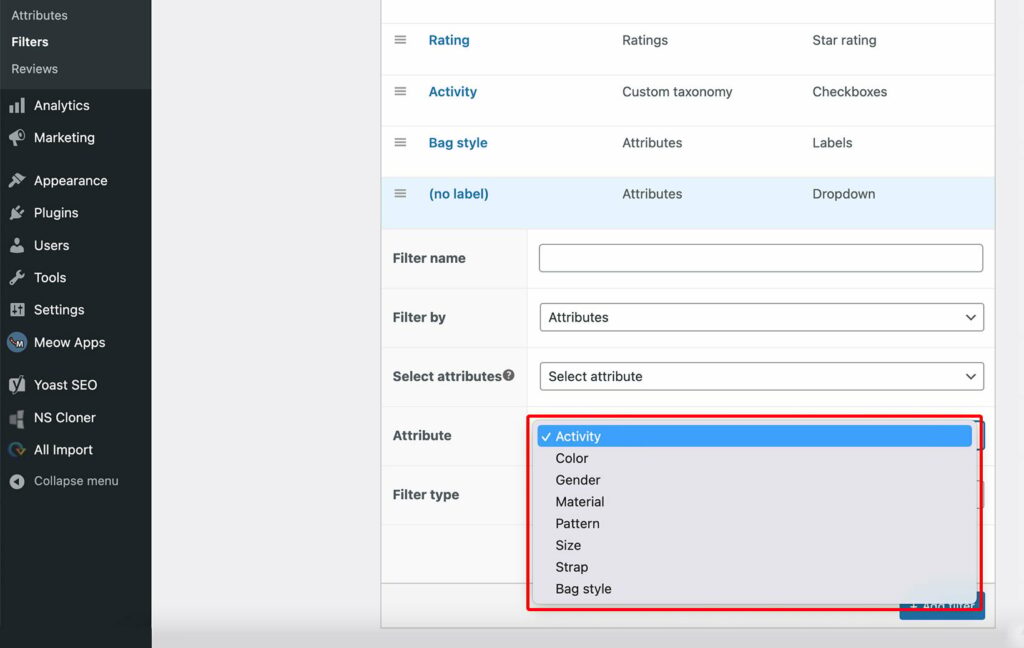
- Install WooCommerce Product Filters on your WordPress site.
- Create a new filter group at Products > Filters.
- Click to add an attribute filter. Either select which attribute you wish to filter by, or use the “Create filters from all attributes” option. (Tip: This is a huge time-saver because it dynamically adds filters for all the global attributes for the products on the current page.)
- Choose a filter style (checkboxes, color swatches, etc.).
- Embed the filters above or beside your product grid:
- Above the product grid – Go to Products > Filters > Settings and select a filter group to appear above your shop pages.
- In the sidebar – Go to the widget editor, add a “Product Filters” widget and select your filter group.
🔎 Real-world example:
A shoe store uses color swatches and size checkboxes — customers easily narrow down to “Size 9 Red Sneakers” without extra page loads.
7. How to Show Product Attributes on the WooCommerce Shop Page
WooCommerce can only display product attributes on individual product pages. Certain products can benefit from displaying attributes directly on your main shop pages. That way, they can compare product data without having to click through.
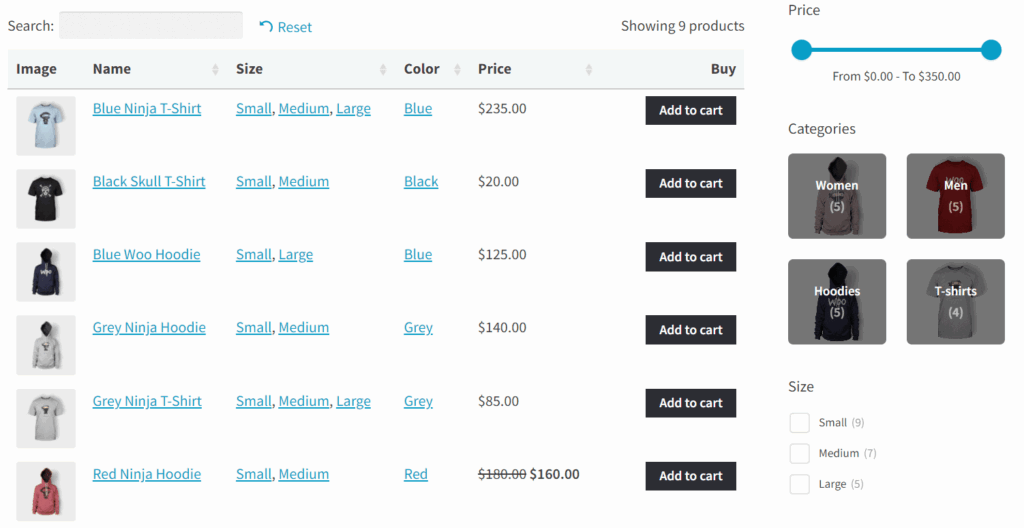
You can do this by installing the WooCommerce Product Table plugin. This lists products in a structured table complete with product attribute columns.
Benefits of Product Tables
- Instant attribute comparison: Easier than flipping through product pages.
- Streamlined buying journey: Add to cart directly from the table.
This can be a game-changer for stores where technical information matters, such as:
- Electronics: Compare RAM, Processor, Screen Size.
- Automotive Parts: Engine Compatibility, Model Fit.
- Medical Supplies: Dosage, Size, Material.
How to Set Up Attribute Columns
- Install WooCommerce Product Table.
- Use the setup wizard to choose your table settings, including adding product attribute columns.
🖥️ Example:
A laptop retailer lists Processor, RAM, Storage, and Battery Life attributes in sortable table columns, making it easy for customers to find the right model.
Improve the Display of WooCommerce Attribute Variations
By default, WooCommerce displays product variations in boring dropdowns. You can upgrade the experience massively with WooCommerce Product Options by Barn2.
Problems with Default Dropdowns
- Hard to navigate if there are many attribute options in a dropdown.
- Non-visual: Bad for options like color or material.
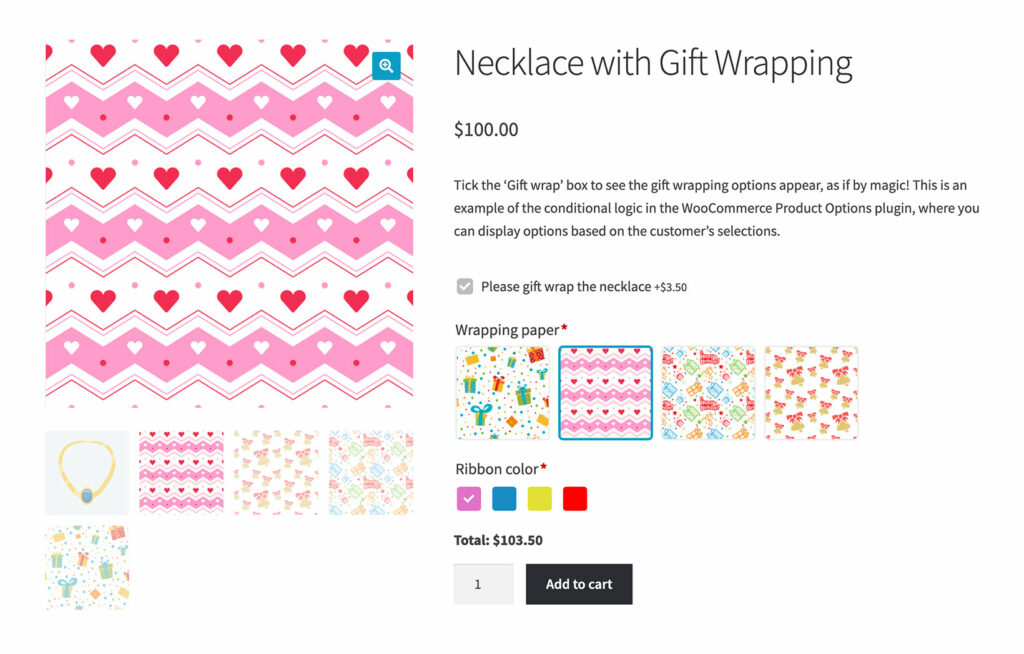
Benefits of Barn2’s Product Options
- Radio buttons for quick selection.
- Image or color swatches for visual color choices.
- Checkboxes for multi-select options.
- Text swatches for cleaner layouts.
Setting Up Better Variation Displays
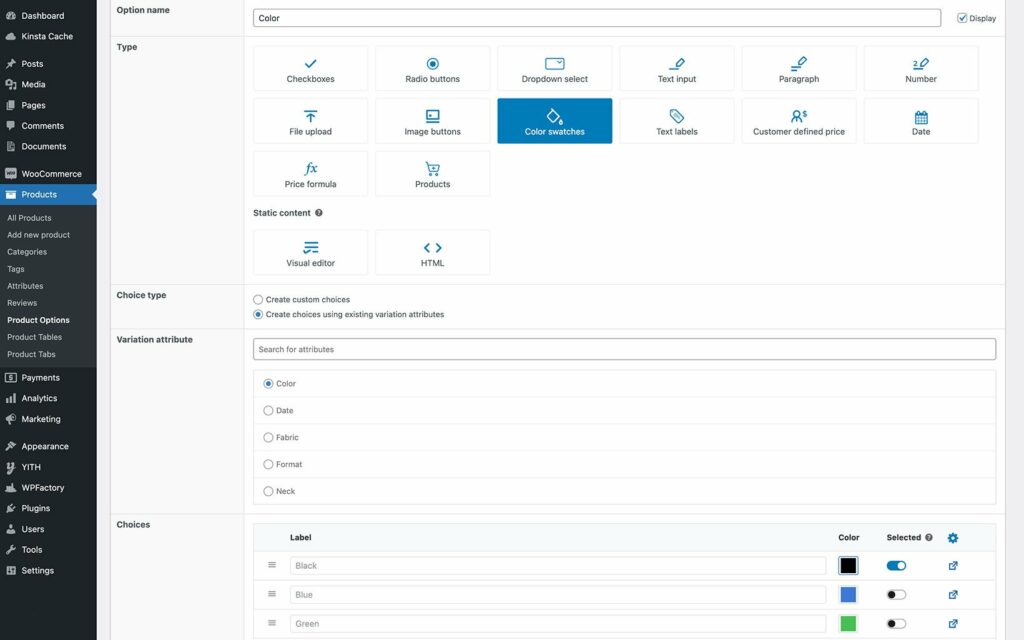
- Install WooCommerce Product Options.
- At Products > Product Options, create option groups linked to your attributes.
- Choose which products to display the attribute options on.
- Choose how you want them to display (checkbox, radio, image, text).
🎨 Example:
Instead of a dropdown for “Color”, show clickable swatches for Red, Blue, Green. Customers can instantly see and choose.
As you can imagine, this UX improvement to your WooCommerce product attributes can result in higher conversions — especially for fashion, home decor, and accessories.
Best Practices for Managing WooCommerce Product Attributes
Product attributes can start to become cluttered as you add more and more. Follow these tips to keep your catalog manageable over time:
✅ Standardize Attribute Names
E.g., Always use “Color” instead of “Colours” or “color”. You can avoid this problem by using global attributes.
✅ Avoid Attribute Overload
Keep attribute choices meaningful to customers.
✅ Audit Attributes Regularly
Remove unused or inconsistent attributes.
Small regular maintenance makes your store cleaner, faster, and easier to navigate. This applies to WooCommerce product attributes as well as other product data.
Supercharge Your Product Attributes!
WooCommerce product attributes are the backbone of an organized, scalable online store.
By mastering attributes — and using tools like Setary for bulk editing, Barn2’s Product Filters for storefront navigation, Product Table for displaying attributes on shop pages, and Product Options for better variation selection — you can offer a world-class shopping experience.
Take control of your attributes today. Your customers will find products faster, enjoy browsing more, and convert at a higher rate — and you’ll save countless hours managing your store.
The smartest way to bulk edit WooCommerce products
Try our demo now and see how you could save thousands of hours when managing your WooCommerce products.
or try the demo