In an e-commerce ecosystem powered by WooCommerce, creating and managing online courses or memberships is an integral aspect for many store owners. One solution that stands out in this niche is LifterLMS, a WordPress plugin designed to transform your website into a versatile learning management system. LifterLMS excels in allowing you to create, sell, and protect engaging online courses and memberships, turning your store into an educational powerhouse.
Whether you’re launching a new course, managing memberships, restricting access to premium content, or customizing course-related call-to-actions, LifterLMS ensures you’re in control of your e-learning platform, enhancing the user experience.
Enter Setary. This tool amplifies the capabilities of LifterLMS by enabling you to manage LifterLMS WooCommerce product settings in bulk via its intuitive spreadsheet editor.
This guide offers step-by-step instructions on how to utilize Setary’s spreadsheet editor to bulk edit LifterLMS settings for WooCommerce products.
To achieve this, Setary introduces two pivotal columns for LifterLMS:
- LifterLMS Members Only: Through this column, products in your store can be restricted, ensuring only those who’ve enrolled in a particular course can access them.
- LifterLMS Members Button Text: This column enables you to customize the text displayed on the members’ button, tailoring your call-to-action as per your preferences.
By leveraging these columns, you can now optimize the LifterLMS settings for your WooCommerce products in bulk, ensuring a seamless e-learning experience for your customers.
Enabling LifterLMS for Setary Requests
- Log into your WooCommerce store. Start by logging into your WooCommerce admin area.
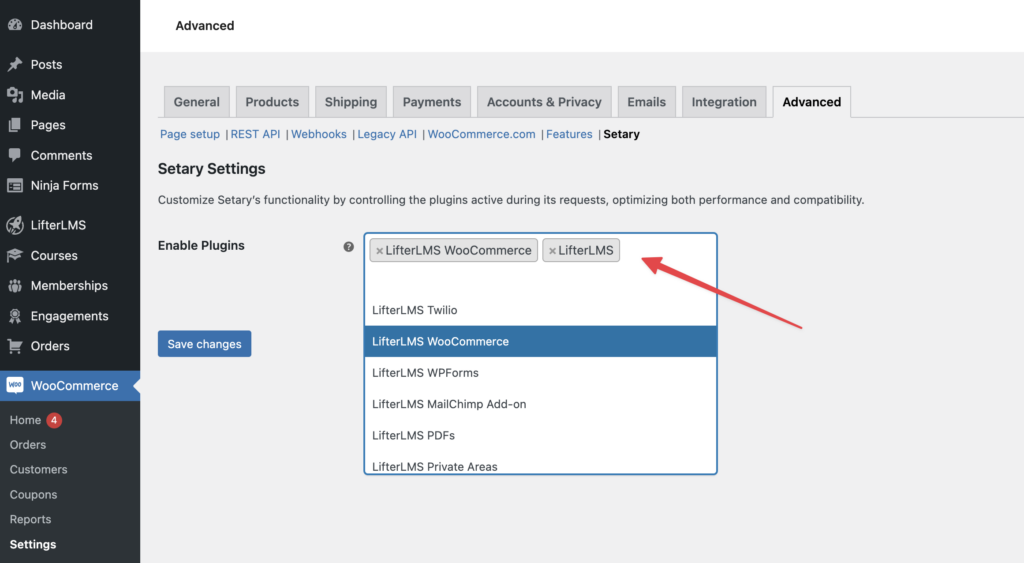
- Navigate to Setary settings. On your WordPress dashboard menu, select WooCommerce, then Settings, and then the Advanced tab. You’ll find Setary listed there.
- Enable LifterLMS. In the Setary settings, you’ll notice a product search field. Type “LifterLMS” into it and select it from the dropdown menu.
- Save your settings. After selecting LifterLMS, remember to save your settings. This activates LifterLMS during Setary’s requests
Loading LifterLMS Columns in the Spreadsheet
- Go to the Setary app and open the Products tab.
- Click the Columns dropdown. You will see a list of columns that can be enabled or disabled.
- Enable the WP Fusion columns. Locate the LifterLMS columns listed above and check their boxes to enable them.
- Save Columns. Click Save Columns to update your spreadsheet. The LifterLMS columns are now ready to use.

Editing the Data
- Locate the LifterLMS columns in your spreadsheet. Scroll sideways in your spreadsheet to find the newly added LifterLMS columns.
- Edit a cell. Double click on the cell in the LifterLMS column for the product you want to edit.
- Save Changes. Click the Save Changes button to apply your edits to your live site.

And there you go! You’ve just discovered how to bulk edit LifterLMS settings for WooCommerce products with Setary. Setary enables you to streamline and manage course and membership settings across multiple products seamlessly.