
Editing WordPress categories one at a time is fine when you have five of them. It stops being fine the moment you have 200. The same goes for WooCommerce product categories, post tags, product tags, and any custom taxonomy on your site. The native admin only lets you edit one term at a time, and Quick Edit only covers the name and slug.
So if you need to mass-update category descriptions, WooCommerce product category thumbnails, SEO titles, meta descriptions, or any custom taxonomy field across a large catalog, you’re stuck clicking through every single one. The bigger your store, the more painful it gets. I’ve seen WooCommerce stores with hundreds of product categories and product tags that take hours to maintain manually.
Setary fixes this by loading your WordPress and WooCommerce data into a fast spreadsheet view that you can edit directly in your browser. It works with products, orders, categories, tags, and any custom taxonomy. Instead of opening each category individually, you edit them in a grid and save all your changes at once.
This post walks through how to bulk edit WordPress categories, tags, and custom taxonomies using Setary. I’ll cover the workflow step by step, then share the real use cases where this approach pays off. After that, there’s a bonus section on how to bulk protect or restrict access to categories using Barn2’s WooCommerce Protected Categories and Password Protected Categories plugins.
What You Can (and Can’t) Do With WordPress Categories Natively
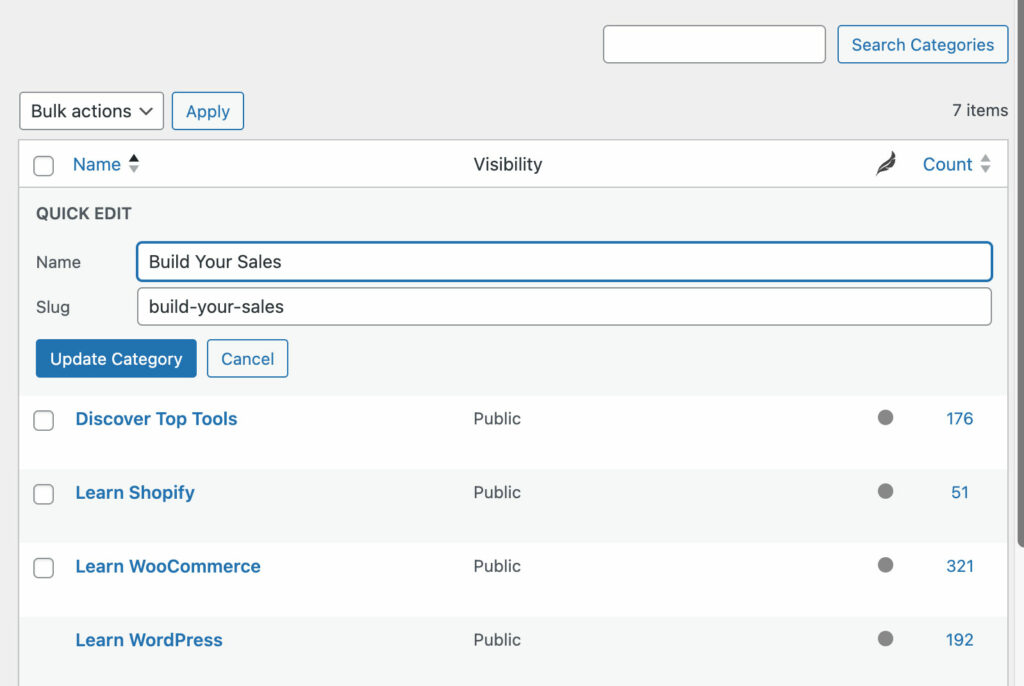
WordPress categories and tags group your content together, but the native admin only lets you edit one item at a time. Quick Edit covers two fields: name and slug. That’s it.
The Bulk Actions dropdown on the categories screen looks promising at first glance. In practice, the only bulk action available is delete. There’s no native way to mass-update descriptions, SEO titles, meta descriptions, custom fields, or visibility settings.
WooCommerce product categories have the same limitations, plus extra fields like the thumbnail image and display type that you can’t touch in bulk either. Custom taxonomies registered by other plugins have the same restrictions. Event categories, course categories, portfolio types, property locations – they all behave the same way. You edit them one at a time.
When You’d Want to Bulk Edit Categories and Taxonomies
Bulk editing isn’t always needed – for small sites, the native screen is fine. However, past a certain catalog size, it becomes the difference between an afternoon of clicking and a 15-minute job.
Here are the situations where I find bulk category editing pays off:
- Adding or rewriting category descriptions across a large catalog, often for SEO reasons.
- Reassigning parent categories after a site restructure.
- Updating SEO titles and meta descriptions for every category at once, for example after a rebrand.
- Consolidating near-duplicate tags like “blue”, “Blue”, and “blue ” into a single clean version.
- Updating WooCommerce product category thumbnails or display types across a range.
- Editing custom taxonomy fields added by other plugins, such as event venues, course difficulty levels, or property types.
- Setting visibility (public or protected) across multiple categories at once, which I’ll cover in the bonus section below.
For situations like these you can save a lot of time with a bulk category and taxonomy editor. And that’s where Setary comes in!
How to Bulk Edit Categories, Tags, and Taxonomies With Setary
Setary loads your categories and taxonomies into a spreadsheet view, so you can edit them like rows in Excel or Google Sheets. Every change shows a small blue dot before you save, which gives you a chance to review everything before it goes live. Here’s how to set it up and start editing.
Step 1: Sign Up and Install the Helper Plugin
Start a free Setary trial at setary.com. Then install the free Setary helper plugin on your WordPress site. The plugin is what connects the Setary app to your site’s data, so this step is essential.
Step 2: Enable the Taxonomies You Want to Edit
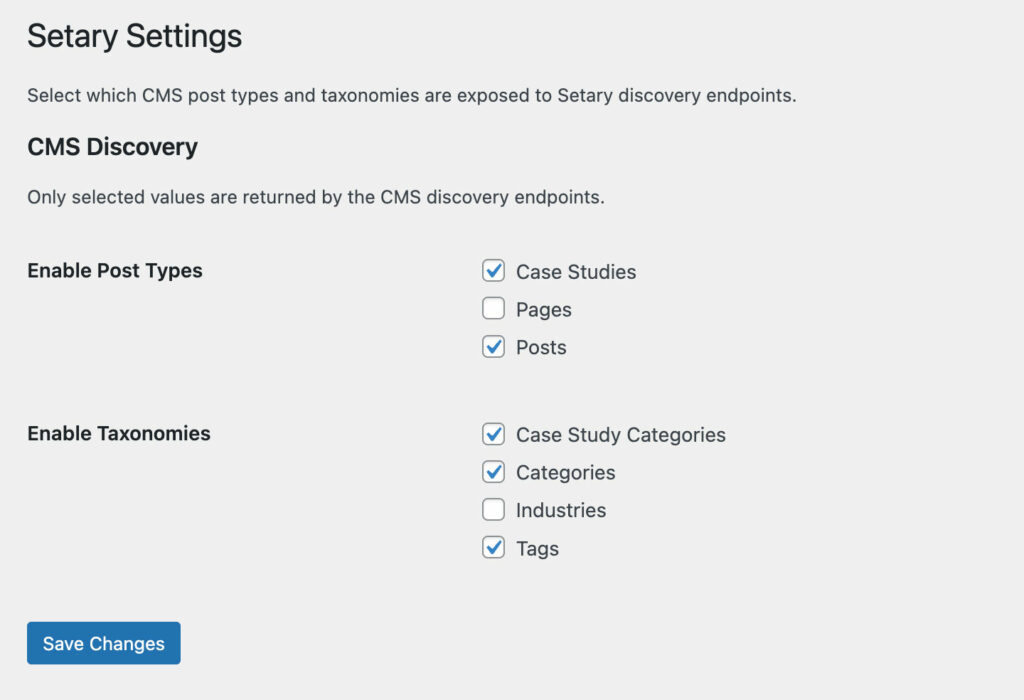
Go to Settings → Setary in your WordPress admin. You’ll see a list of every post type and taxonomy on your site. Tick the box next to each taxonomy you want to edit in Setary.
This list includes standard categories and tags, WooCommerce product categories and product tags, and any custom taxonomies registered by other plugins. Save your settings once you’ve ticked everything you need.
Step 3: Open the Setary App and Choose a Taxonomy
Go to setary.com/app and log in. Each enabled post type and taxonomy appears as a tab along the bottom of the spreadsheet, similar to sheet tabs in Google Sheets.
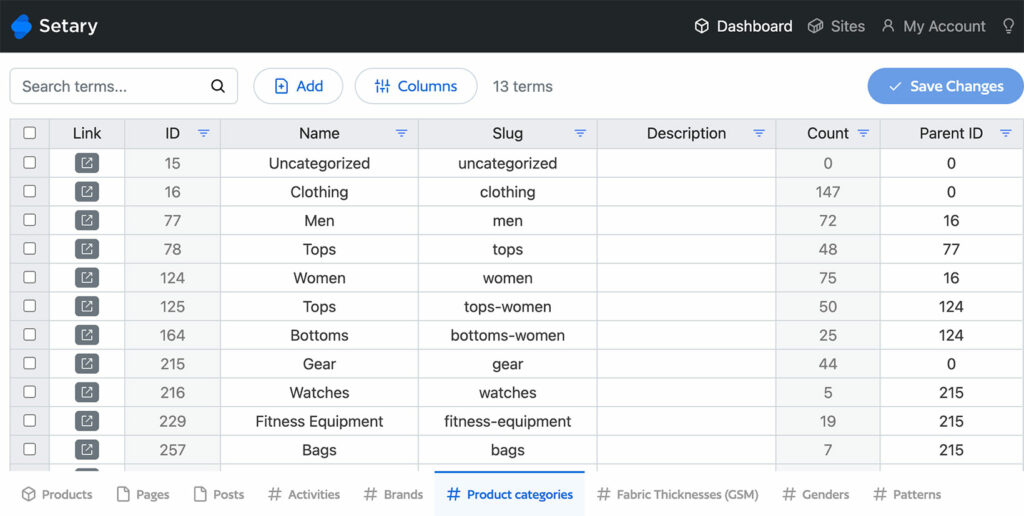
Click the tab for the taxonomy you want to edit, for example ‘Categories’ or ‘Product Categories’. The spreadsheet then loads every term in that taxonomy as a row.
Step 4: Choose Which Columns to Show
Click the ‘Columns’ button at the top of the spreadsheet. A panel opens listing every available field for the selected taxonomy. Tick the ones you want to bulk edit and untick the ones you don’t need.
Available columns typically include name, slug, description, parent, count, SEO title, meta description, and any custom fields added by other plugins. Hiding columns you don’t need keeps the view focused on the actual job.
Step 5: Make Your Changes
Click into any cell and edit it directly, just like a spreadsheet. You can copy and paste blocks of data, drag values down a column, or use keyboard shortcuts to move around quickly. A blue dot appears next to every cell you’ve changed, so you can spot exactly what you’ve edited.
Step 6: Review and Save
Scan the blue dots before saving. This is your last chance to catch anything that looks wrong. When you’re happy, click ‘Save Changes’ to push all your edits to WordPress at once.
The same workflow applies to every taxonomy on your site. Categories, tags, product categories, product tags, and any custom taxonomy all behave the same way in Setary.
Bonus: How to Bulk Protect or Restrict Access to WordPress and WooCommerce Categories
Sometimes you want to do more than edit category content. You want to restrict who can see entire categories – for wholesale products, member-only content, or staff-only documents. This isn’t possible natively in WordPress, but you can do it with two tools used together: Barn2’s Protected Categories plugins for the access control, and Setary for the bulk part.
What Barn2’s Protected Categories Plugins Do
WooCommerce Protected Categories restricts access to WooCommerce product categories. Its sister plugin, Password Protected Categories, does the same for standard post categories and any custom post type categories – event categories, course categories, gallery categories, or any other category registered by your other plugins.
Both plugins give you three ways to protect a category:
- Password-protect the category so anyone with the password can view it.
- Restrict the category to specific user roles, such as wholesale customers or editors.
- Restrict the category to specific named users.
When You’d Want to Protect Categories
I see this come up across a wide range of sites:
- Wholesale stores hiding trade-only product categories from retail customers.
- Membership sites restricting course or content categories to paying members.
- B2B catalogs showing different categories to different customer segments.
- Internal document libraries restricting staff-only categories.
- Schools restricting certain learning materials to specific user roles.
How to Protect a Single Category in the WordPress Admin
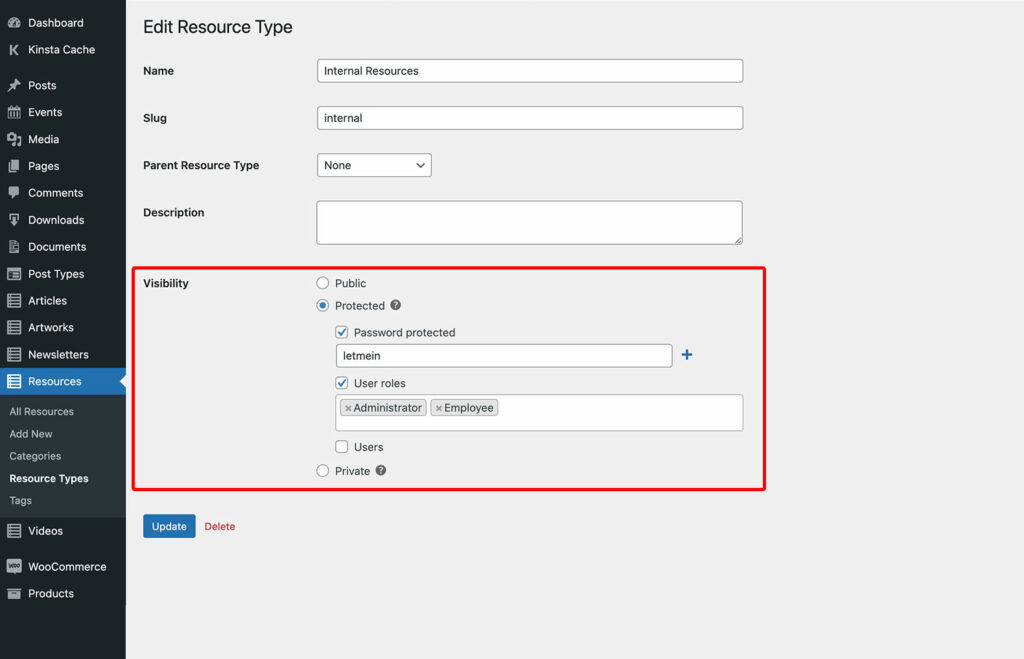
Setting protection on one category is straightforward:
- Install and activate the relevant plugin.
- Go to your category edit screen. For WooCommerce, that’s Products → Categories. For blog posts, it’s Posts → Categories.
- Open any category and scroll to the ‘Visibility’ option.
- Choose ‘Public’ or ‘Protected’.
- If you chose ‘Protected’, pick a method: password, user roles, or specific users.
- Save the category.
This works fine for one or two categories. For dozens, it gets painful fast.
How to Bulk Protect Categories With Setary
- First, use the instructions above to apply each type of protection to at least one category. This is essential in order for the protection fields to be available in the Setary spreadsheet.
- Next, open the relevant taxonomy tab in Setary, such as ‘Product Categories’ or ‘Categories’.
- Click the ‘Columns’ button and make sure these four columns are visible: ‘Visibility’, ‘Password’, ‘User Roles’, and ‘Users’.
- Now you can set protection on each category directly in the spreadsheet:
- Set ‘Visibility’ to
publicorprotected(in lowercase). - To password-protect a category, enter the password in the ‘Password’ column.
- To restrict by user role, list the roles in the ‘User Roles’ column, comma-separated and in lowercase. For example:
administrator,editor. - To restrict to specific users, enter the user IDs in the ‘Users’ column, comma-separated. For example:
25366,2. You can find a user ID in the URL of their edit user page in the WordPress admin.
- Set ‘Visibility’ to
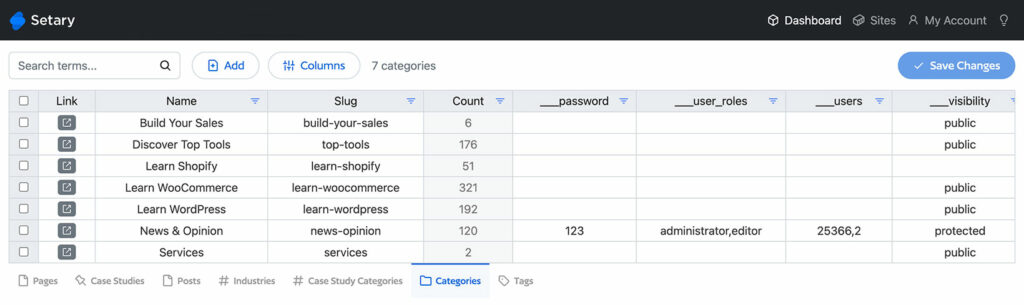
Review the blue dots to confirm everything looks right, then click ‘Save Changes’. Every protected category updates at once.
This combination – Barn2’s protection plugins for the access control logic, Setary for the bulk part – is how a lot of our customers handle large protected catalogs.
Final Thoughts
The native WordPress category screen is fine for small sites, but it becomes a real bottleneck once you have more than a handful of categories to manage. Quick Edit only handles name and slug, and the only bulk action available is delete. So for anything more than that, you need the right tool for the job.
Here’s a quick recap of which plugin to use for which task:
- To bulk edit categories, tags, and custom taxonomies: use Setary to load them into a spreadsheet view and edit them all at once.
- To restrict WooCommerce product categories by password, user role, or specific users: use WooCommerce Protected Categories.
- To restrict post categories or any custom post type categories (event categories, course categories, gallery categories, and so on): use Password Protected Categories.
- To apply protection settings to lots of categories at once: combine either of the Barn2 plugins above with Setary, so the access control logic and the bulk editing work together.
Which taxonomy on your site do you most wish you could bulk-edit?
Bulk edit anything in WordPress, WooCommerce and Shopify
Try our demo now and discover how you could save thousands of hours managing your site.
or try the demo