
Updating inventory in Shopify sounds straightforward until you’re facing 500 variants with a restock email going out tomorrow morning. One wrong number causes oversells. Oversells mean angry customers. And angry customers leave reviews that stick around long after the stock issue is resolved.
Most store owners hit this problem in one of three situations. First, there’s the reactive scramble — a sale went live with the wrong stock counts and support tickets are already coming in. Second, there’s the planned restock — a shipment arrived and you need to update hundreds of SKUs before your next email campaign. Third, there’s the regular sync — daily or weekly inventory updates that need to be fast, accurate, and repeatable.
Each situation calls for a different approach. There are three main ways to bulk edit inventory in Shopify: the native bulk editor, CSV import and export, and an app like Setary. This guide covers all three — including where each one breaks down — so you can choose the right method for your store.
Why Bulk Editing Inventory in Shopify Is More Complex Than It Looks
Shopify tracks inventory at the variant level, not the parent product level. That’s the root of most bulk editing headaches. A t-shirt with 5 colors and 4 sizes isn’t one product to update — it’s 20 separate inventory entries.
There’s no “update all variants” button. Each variant needs its own row, its own value, its own attention. That’s fine when you have 15 products. It becomes a serious problem at 150.
The same applies to stores with large numbers of simple products. When you’re managing 300 individual SKUs, even a basic restock update requires touching hundreds of rows. Shopify’s native tools weren’t designed for that kind of volume.
Understanding this variant-level structure upfront helps you choose the right method. The approach that works for 20 products often fails completely at 200.
Method 1: Shopify’s Native Bulk Editor
Shopify has two built-in routes for bulk editing inventory, depending on what you need to change.
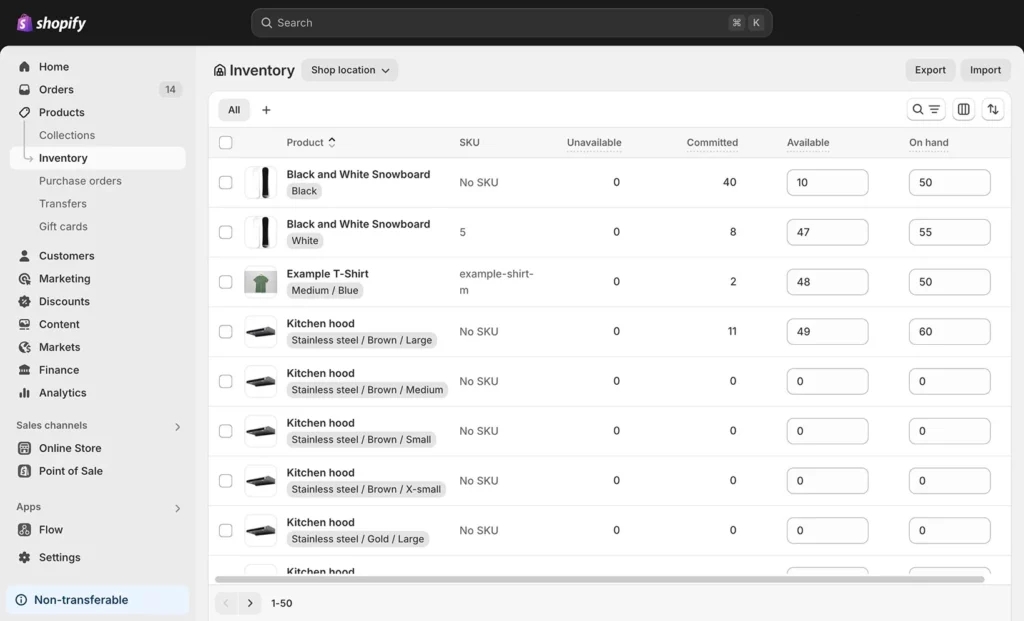
To update stock quantities, go to Products → Inventory in your Shopify admin. Select the products and variants you want to edit using the checkboxes, then click ‘Edit variants’. A spreadsheet-style editor opens with each variant on its own row. Click into any cell and type a new value. You can drag values down multiple rows or copy and paste — the same controls you’d use in a regular spreadsheet.
To edit other inventory data alongside quantities — prices, SKUs, compare-at prices — go to Products → All products instead. Select up to 50 products using the checkboxes, then click ‘Bulk edit’. Use the ‘Columns’ button to add or remove the fields you want to edit.
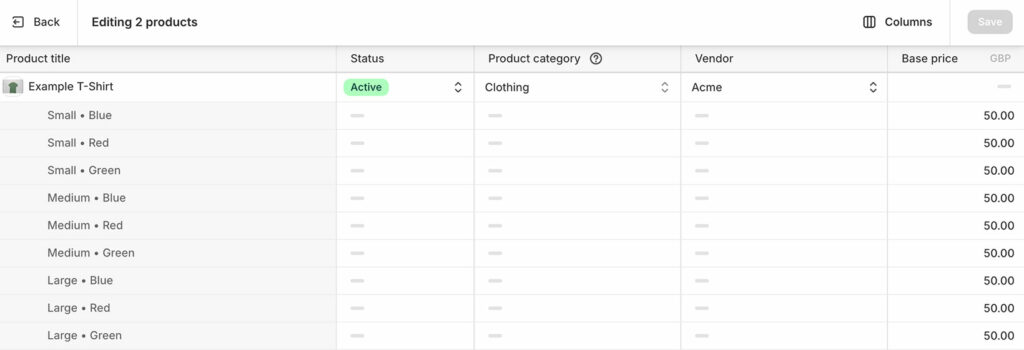
Always double-check your entries before saving. There’s no undo button once changes go live.
Editing Variant Quantities in Bulk
Shopify gives you two routes for bulk editing variant stock specifically.
The first is through Products → Inventory. Enter the new quantity for each variant directly in the editor. Note that variants set to ‘Don’t track inventory’ won’t appear on this page at all. If a variant is missing, check its tracking settings first.
The second is through the individual product page. Navigate to the product, select the variants you want to edit, and click ‘Bulk Edit’ to update them individually. Or click the three-dot menu and select ‘Edit quantities’ to assign the same stock level to all selected variants at once. This is the closest Shopify gets to a parent-level update — but it only works within a single product, not across your whole catalog.
Limitations of the Native Bulk Editor
For small catalogs, the built-in tools are fine. Once your store grows, you’ll hit these constraints quickly:
- Hard limit of 50 products per bulk edit session.
- No undo function after saving changes.
- Unsaved work is lost if the page refreshes.
- Can’t view multiple inventory locations at the same time.
- Each variant must be edited individually — no shortcut to update all sizes or colors of a product in one step (unless using the product page method above).
- The bulk editor doesn’t save your column configuration between sessions, so you have to reconfigure it every time.
If you’re managing more than 50 products, or you need to run the same type of update on a regular basis, you’ll need a different approach.
Method 2: CSV Import and Export
When the native editor hits its limits, most merchants turn to CSV. It’s Shopify’s built-in method for large-scale inventory updates and handles thousands of SKUs at once.
The basic process: export your products to a CSV file, update the ‘Variant Inventory Qty’ column in a spreadsheet, then re-import the CSV file via Products → Import. Select ‘Overwrite any current products that have the same handle’ to update existing inventory levels rather than create new products.
Each variant needs its own row in the CSV, matching Shopify’s variant-level structure. Before making any changes, always export and save a backup copy so you can restore the original data if something goes wrong.
The Complete CSV Workflow
Step 1: Export your current inventory
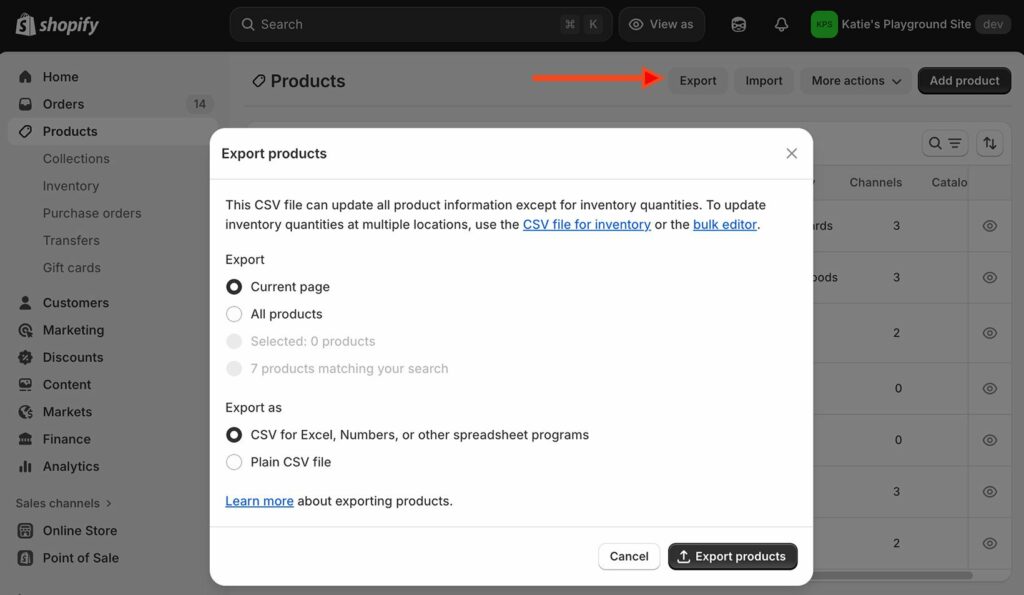
- Go to Products in your Shopify admin.
- Click ‘Export’.
- Select ‘All products’ or apply filters to narrow the export.
- Choose ‘Plain CSV file’.
- Save the file with a timestamp — for example, inventory_2025_04_02.csv — and keep a second copy as a backup before editing anything.
Step 2: Edit your quantities

- Open the file in Excel, Google Sheets, or Numbers.
- Find the ‘Variant Inventory Qty’ column. Each variant is a separate row.
- Update the quantities you need to change. Leave other fields untouched.
- Keep the file under Shopify’s 15 MB import limit.
Step 3: Re-import the updated file
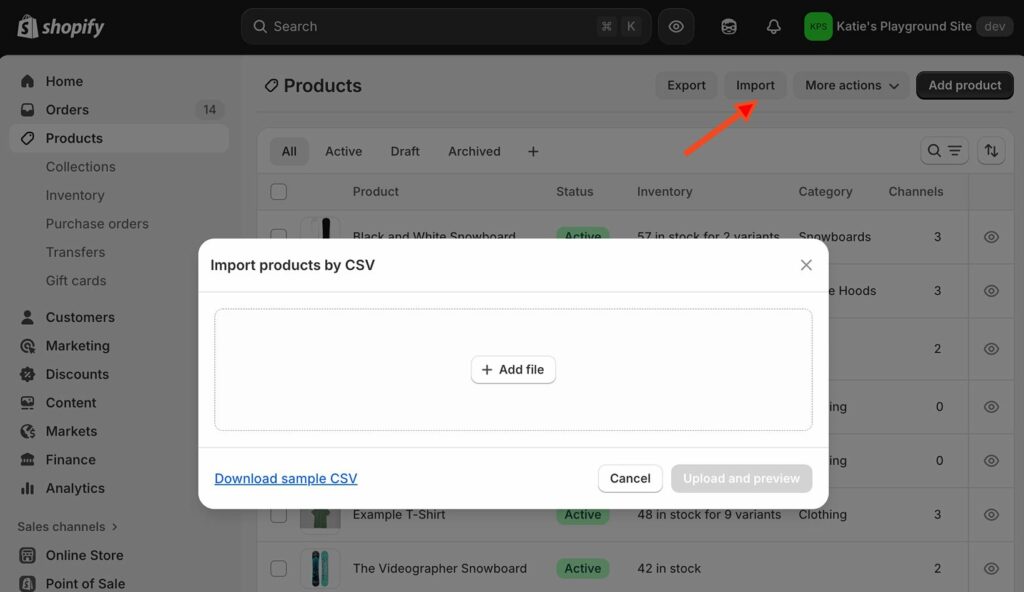
- Go to Products → Import.
- Select ‘Overwrite any current products that have the same handle’.
- Click ‘Upload and continue’.
- Review the preview carefully before confirming.
- Shopify sends a confirmation email when the import is complete.
Handling Multi-Location Inventory with CSV
For stores with multiple locations, CSV imports get significantly more complex. Each location needs its own column, formatted as ‘Variant Inventory Available [Location Name]’ — with the location name matching exactly, including capitalization and spacing.
A single typo creates an unwanted new location in your system rather than updating the existing one. For a product with 20 variants across 5 locations, that’s 100 individual cells to get right. Multiply that across a real product catalog and the margin for error grows fast. This is where CSV imports become genuinely risky, even for experienced merchants.
Common CSV Errors and Why They Happen
CSV imports are powerful, but the failure modes are unforgiving:
- Importing a CSV overwrites all product data, not just inventory fields. Accidentally blank cells erase existing information.
- You can’t make incremental adjustments — entering 50 sets the quantity to exactly 50. It doesn’t add 50 to the current count.
- Processing time is unpredictable. An import can take 5 minutes or over 2 hours depending on catalog size.
- Once an import starts, you can’t pause or cancel it. If customers place orders during that window, inventory mismatches are almost inevitable.
- Column headers must match exactly. “Variant inventory qty” fails. “Variant Inventory Qty” works.
- Excel auto-formatting silently corrupts SKUs. A code like “00123” becomes “123” without any warning.
- Hidden special characters from copying data between programs can trigger errors that are difficult to diagnose.
Schedule CSV imports during low-traffic periods to reduce the risk of order conflicts. Early morning or late evening works best for most stores. Check your analytics to find your quietest window before you schedule anything important.
Method 3: Setary — Live Spreadsheet Editing Without the Risk
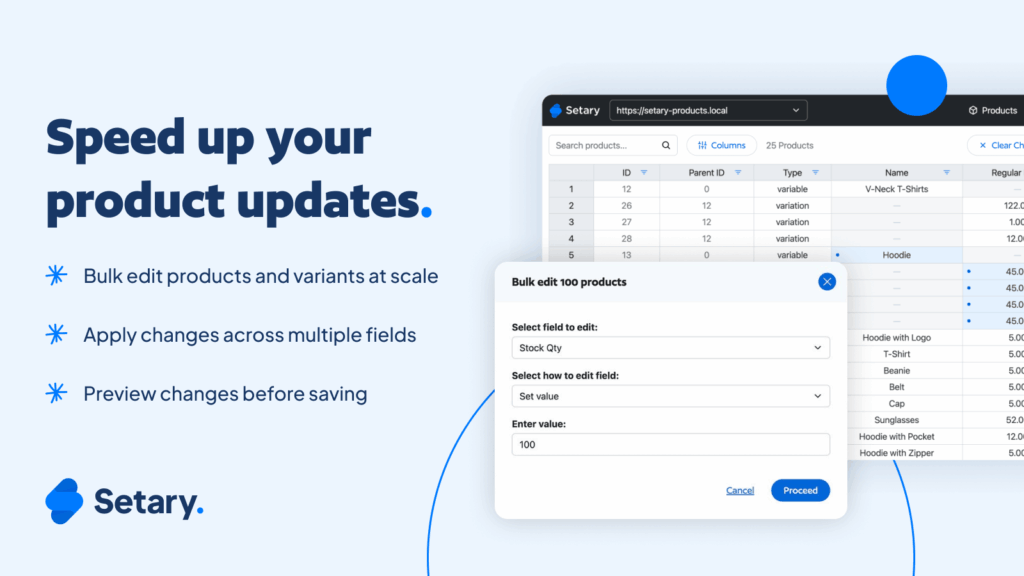
Native tools cap out at 50 products. CSV imports handle scale but require careful formatting and carry real risk. Setary is a third option that solves both problems.
Setary is a bulk editing app for Shopify that loads your entire product catalog into a live spreadsheet. You edit quantities directly in cells — the same way you’d work in Excel or Google Sheets — but without the export-edit-reimport cycle and without the risk of accidentally overwriting data you didn’t intend to change.
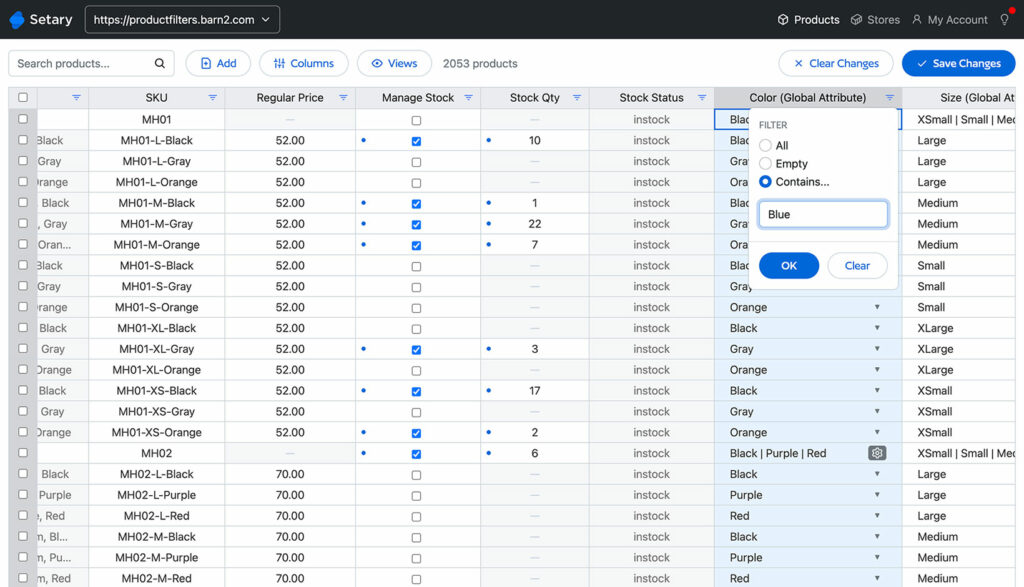
Because changes preview before they go live, you can catch mistakes before they affect your store. And because the editor stays connected to your live catalog, you’re always working with current data rather than a snapshot that may already be out of date by the time you import it back.
How to Bulk Edit Inventory with Setary
- Install Setary for Shopify.
- Open the bulk editor. Your entire catalog loads in spreadsheet format automatically — no export step needed.
- Use filters to find the products or variants you want to update. Filter by stock level, product type, vendor, tag, or any other attribute.
- Edit quantities directly in the cells, or use ‘Bulk actions’ to apply the same change across many variants at once.
- Preview your changes before saving to catch any mistakes.
- Save. Changes go live immediately, with no import queue to wait for.
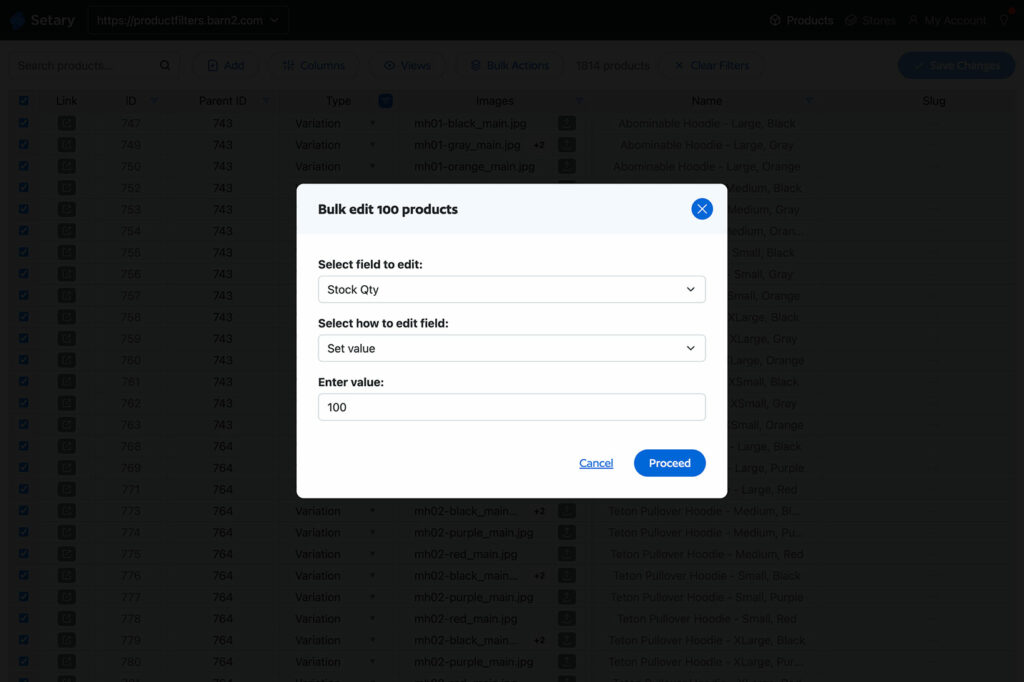
If you’ve used Excel or Google Sheets before, the interface feels immediately familiar. There’s no meaningful learning curve.
What Makes Setary Different
Setary includes features that native Shopify tools and CSV imports can’t match:
- No product cap. Your full catalog loads in one view. No pagination, no 50-product session limits.
- Percentage-based updates. Increase all quantities by 20% with a single bulk action. No manual calculations needed.
- Smart filtering. Find low-stock products instantly. Save filter combinations as views for daily or weekly inventory checks.
- Multi-location support. View and edit inventory across all locations in a single interface, without the column-naming risks that make CSV multi-location updates so error-prone.
- Change history. Track who updated what and when. This is especially useful for teams where more than one person manages inventory.
- Queue processing. Schedule bulk updates to run during low-traffic hours automatically.
- Preview before saving. Review every change before it goes live. No surprises, no accidental overwrites.
- CSV import into Setary. If your warehouse team sends a spreadsheet, you can import it directly into Setary rather than dealing with Shopify’s native import process.
When Setary Makes the Most Difference
Setary earns its place most clearly in a few specific situations.
The first is regular restocks. If your team updates inventory on a weekly or monthly basis, the CSV export-edit-reimport cycle wastes significant time. Setary turns a 45-minute task into a 10-minute one.
The second is multi-location stores. Managing inventory across several warehouses or fulfillment centers in native Shopify or via CSV requires careful column formatting every single time. Setary handles all locations in one view without any formatting risk.
The third is teams. When more than one person updates inventory, knowing who changed what and when matters. The change history in Setary makes that accountability straightforward without requiring a separate process.
Best Practices for Safe Bulk Inventory Updates
Whichever method you use, a few habits reduce the risk of costly mistakes.
Test on a small batch first. Edit 5 to 10 products before running a full catalog update. This catches formatting issues or wrong values before they spread. It adds a few minutes and saves hours of cleanup.
Perform updates during quiet hours. Check your analytics to find your store’s lowest-traffic window. Early morning works for most stores. If something goes wrong during a low-traffic period, fewer customers are affected and you have more time to fix it before orders pile up.
Use tags to organize products for repeatable edits. Tags like ‘needs-restock’ or ‘seasonal-items’ make it faster to filter the right group each time. This also reduces the risk of accidentally editing products you didn’t intend to include.
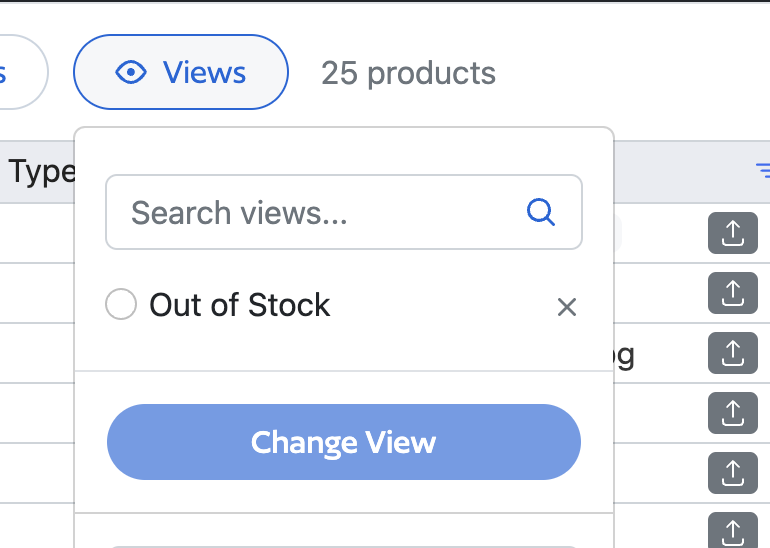
Save time with pre-saved views. Setary’s “Views” feature helps you save even more time. Once you’ve filtered to view the products whose inventory you edit frequently, save the view. That way, you can instantly return to the same pre-filtered view next time.
Keep a simple change log. Record who requested the update, what changed, and why. A shared spreadsheet is enough for most teams. When something goes wrong — and eventually it will — a change log is the fastest way to identify what happened and when.
Back up before every bulk edit. Always export a timestamped copy of your current catalog before uploading any changes via CSV. If the import corrupts data, that backup is your only way back.
Use consistent SKU naming conventions. Consistent SKUs make it easier to bulk edit SKUs in any tool. Establish naming rules early and apply them to all new products. Retrospectively cleaning up inconsistent SKUs is a painful job that’s worth avoiding from the start.
Which Method Is Right for Your Store?
Shopify’s native bulk editor is the right starting point for small stores making occasional changes. It requires no setup, handles up to 50 products, and works well for straightforward quantity updates.
CSV import is the right choice for large-scale, infrequent updates — full catalog migrations, major restocks, or situations where you’re working with data your warehouse team already has in spreadsheet format. It handles unlimited SKUs but requires careful formatting, a backup before every import, and a low-traffic window. One mistake can affect every product in the file.
Setary is the right choice for stores that update inventory regularly, manage a large catalog, or need multi-location support without the CSV formatting risks. It combines the familiarity of a spreadsheet with the safety of a preview step and the speed of a live connection to your catalog.
If you’re spending more than a few hours a month on inventory updates, that time is worth recovering. Install Setary from the Shopify App Store and see how quickly mass inventory editing can become a routine task rather than a stressful one.
Bulk edit anything in WordPress, WooCommerce and Shopify
Try our demo now and discover how you could save thousands of hours managing your site.
or try the demo