
Time is a valuable resource for any Shopify merchant. Every minute spent clicking through individual product pages to update variant prices or stock is a minute stolen from marketing, customer service, or strategic planning. And when you’re managing a catalog with thousands of size and color combinations, those stolen minutes quickly become stolen days.
Some store owners spend entire weekends manually updating variant prices before a flash sale. The frustration is real, especially when you know there has to be a better way. The good news? There absolutely is. Whether you’re adjusting prices across 50 variants or 50,000, the right approach can transform hours of tedious work into minutes of focused effort.
The challenge isn’t finding any method to bulk edit variants in Shopify. It’s finding the right method for your specific situation. The native editor works until it doesn’t. CSV files offer power but demand precision. Third-party apps provide safety nets but require investment. Each approach has trade-offs that matter more or less depending on your catalog size, technical confidence, and how often you need to make bulk changes.
This guide breaks down exactly how to bulk edit variants in Shopify for maximum productivity. You’ll learn which method fits your catalog size, technical comfort level, and specific workflow needs. We’ll cover everything from Shopify’s built-in tools to spreadsheet-style apps that give you Excel-level control without the CSV headaches. By the end, you’ll have a clear strategy for handling any bulk variant editing task efficiently and safely – whether you decide to use native Shopify, CSV imports, or a bulk edit tool like Setary.
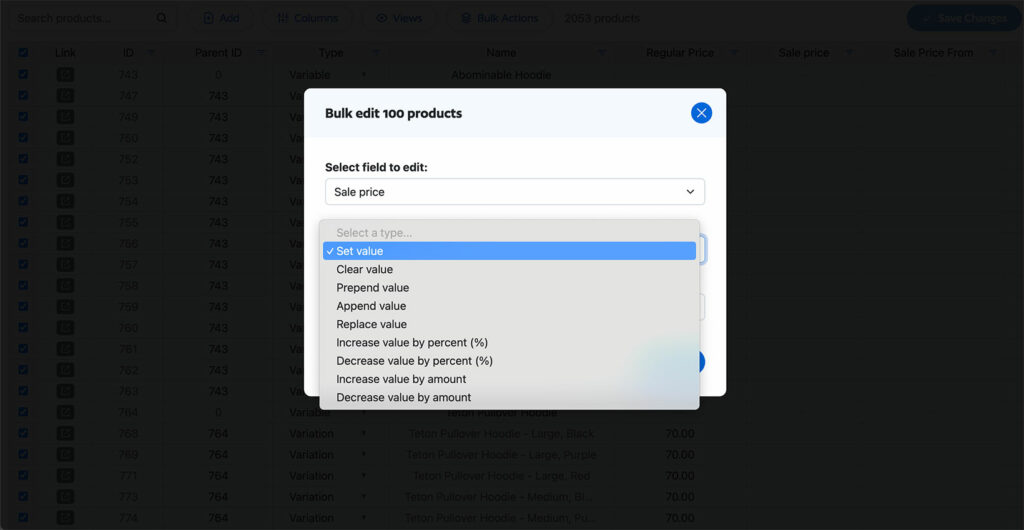
How Shopify Variants Multiply (and Why Bulk Editing Becomes Essential)
Variants are the hidden complexity multiplier in every Shopify store. A single product with three sizes and four colors doesn’t create one item to manage. It creates twelve distinct variants, each with its own price, SKU, inventory count, and potentially unique specifications.
The math escalates quickly. Add 100 products with similar option combinations, and you’re suddenly responsible for 1,200 variants. Scale to 500 products, and that number balloons to 6,000 individual line items requiring occasional updates. This variant multiplication explains why catalog management becomes overwhelming as stores grow.

Common Scenarios That Trigger Bulk Variant Needs
Certain business situations make the ability to bulk edit variants in Shopify absolutely essential rather than merely convenient:
- Supplier price increases: When your supplier raises costs by 8%, you need to adjust thousands of variant prices proportionally. Doing this manually isn’t just slow; it’s genuinely impossible within reasonable timeframes.
- Seasonal sales and promotions: Flash sales require rapid price changes across specific collections. Black Friday preparation might involve temporarily reducing prices on 3,000 variants, then restoring them afterward.
- Inventory reconciliation: After physical stock counts, variant quantities often need correction across the entire catalog. Discrepancies between Shopify records and actual inventory create fulfillment problems if not addressed quickly.
- Adding new options across existing products: Introducing a new “XXL” size option to your clothing line means creating variants for hundreds of existing products simultaneously.
- Metafield population: Custom data like fabric composition, care instructions, or compliance information often needs adding to variant records in bulk after initial product setup.
Each scenario shares a common thread: the work involves repetitive changes across many similar items. That’s exactly where bulk editing delivers its productivity gains.
What You Can Bulk Edit for Shopify Variants
Before choosing a bulk editing method, you need to understand exactly which fields you can modify at the variant level versus the product level. This distinction trips up many merchants who expect to change everything from a single interface.
Variant-Specific Fields
These attributes belong to individual variants and can be edited in bulk across multiple products:
- Price and compare-at price: The most commonly bulk-edited fields, essential for sales and price adjustments.
- SKU: Stock keeping units that identify each variant in your inventory system.
- Barcode: UPC, EAN, or other scannable codes for warehouse operations.
- Inventory quantity: Stock levels per variant, per location if you use multiple warehouses.
- Weight: Used for shipping calculations, critical for accurate rate quotes.
- HS code: Harmonized system codes for international shipping and customs.
- Country of origin: Required for many international compliance requirements.
The Product vs. Variant Distinction
Some fields exist only at the product level and cannot be differentiated per variant. Understanding this prevents frustration when you can’t find certain options in variant bulk editors:
- Tags: Product tags in Shopify are applied to the entire product, not individual variants.
- Product category: Determines where the product appears in your store’s navigation.
- Meta description: SEO content applies to the product page, not specific variants.
- Product title and description: Shared across all variants of a product.
If you need to bulk edit products in Shopify at the product level rather than the variant level, the methods differ slightly. However, tools such as Setary can handle both.
Variant Metafields
Metafields in Shopify represent custom data attached to variants. They’re increasingly important for stores needing to display technical specifications, compliance information, or detailed product attributes. Examples include fabric composition percentages, battery specifications for electronics, or ingredient lists for consumables.
Not all bulk editing methods handle metafields equally. The native Shopify editor has limited metafield support, while specialized apps typically offer comprehensive metafield bulk editing capabilities.
The API Reality Every Merchant Should Know
Here’s something that fundamentally changes how you should evaluate bulk editing tools: Shopify enforces API rate limits that apply equally to every method.
The GraphQL Admin API allows approximately 1,000 cost points per minute for standard plans. Shopify Plus accounts receive higher limits, but even they face constraints. This means that whether you’re using the native editor, a CSV import, or a sophisticated third-party app, the underlying speed at which Shopify processes your changes remains essentially identical.
What does this mean practically? A 5,000-variant update takes roughly the same processing time regardless of which tool initiates it.
Think of it like traffic on a highway. Every car has to obey the speed limit regardless of whether it’s a compact sedan or a sports car. The sports car might accelerate faster getting onto the highway, but once you’re in traffic, everyone moves at the same pace. Bulk editing tools work similarly: the best ones get you started faster and make the journey more comfortable, but they can’t break Shopify’s speed limit.
Why “Fastest Tool” Claims Are Misleading
When app developers claim their tool is “faster” than competitors, they’re usually referring to how quickly you can input your changes, not how quickly Shopify processes them. That’s a meaningful distinction. An app with a better interface lets you specify your bulk edit faster, but the actual update still processes at Shopify’s pace.
Instead of chasing speed claims, focus on what actually varies between methods: error prevention, undo capabilities, filtering power, and formula support. Look for convenience in making the changes, not how quickly they are saved in Shopify.
Method 1: Shopify’s Built-In Bulk Editor
Shopify includes a native bulk editing interface accessible directly from your admin panel. For small batches of variants, it’s often the simplest choice because there’s nothing to install or configure.
Step-by-Step Process
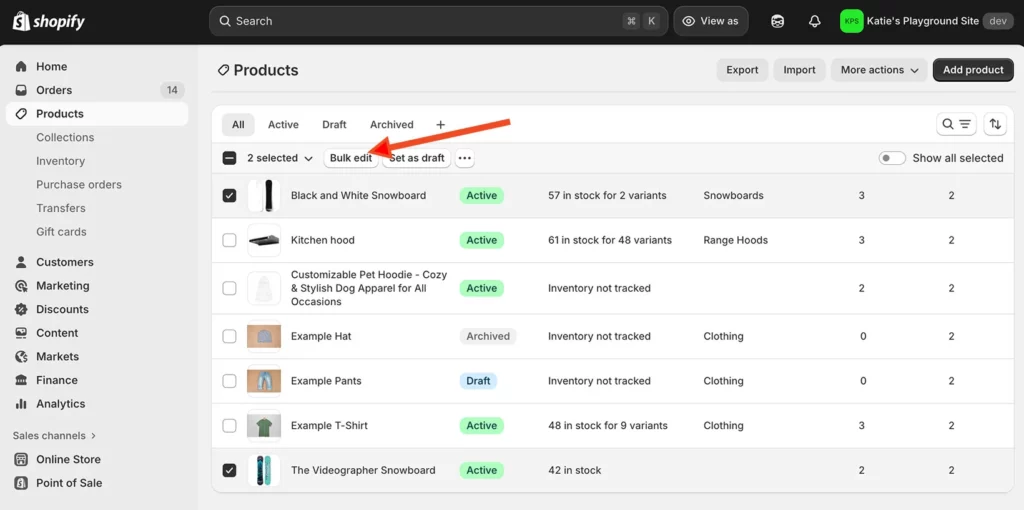
- Navigate to Products in your Shopify admin dashboard.
- Use filters or manual selection to choose the products containing variants you want to edit.
- Click the Bulk edit button that appears above your product list.
- In the bulk editor interface, click Columns to add variant-specific fields like Price, Compare at price, SKU, or Inventory quantity.
- Edit values directly in the spreadsheet-style grid. Click into cells and type new values.
- Click Save when finished. Shopify processes your changes and applies them to your live store.
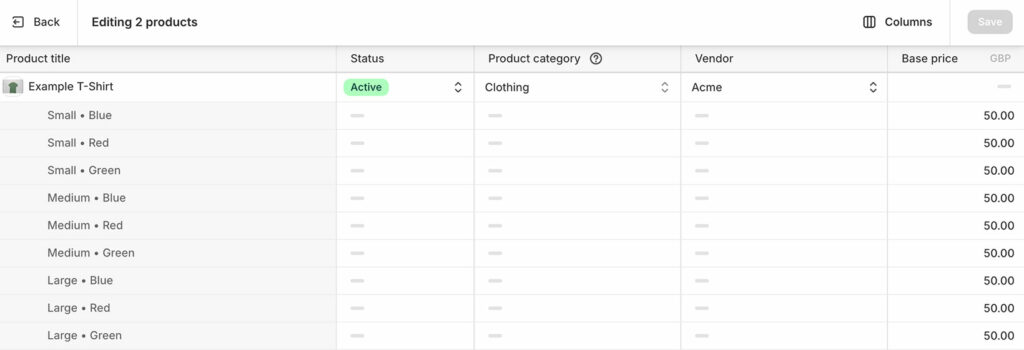
The interface displays 50 products per page. If your selection exceeds this, you’ll need to save changes, navigate to the next page, and continue editing in batches.
As you can see, the native bulk variant spreadsheet editor is quite basic. If you want extra features such as advanced filters and bulk actions then you might prefer the Setary spreadsheet editor, which we’ll talk about in a minute.
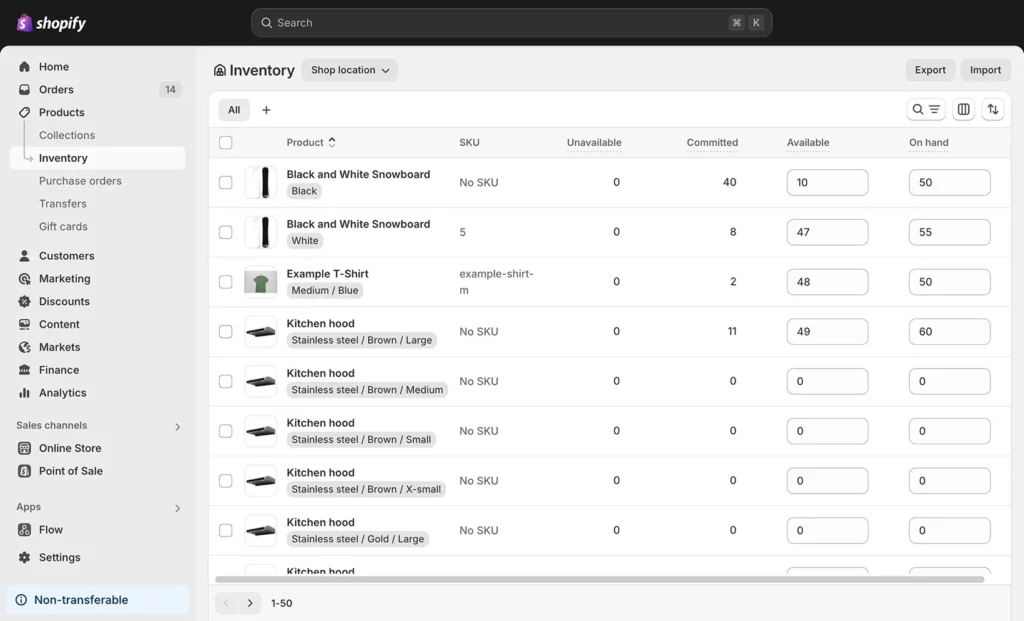
How to bulk edit variant inventory
Shopify also provides a simple bulk editor for making stock/inventory updates. You can find this at Products > Inventory:
The Practical Ceiling
The native editor works reasonably well for updates involving fewer than 500 total variants. Beyond this threshold, performance degrades noticeably. Browser memory consumption increases with each row loaded, and you’ll experience sluggish cell responses, stuttering scrolls, and occasional freezes.
At around 1,000-2,000 variants, most browsers struggle significantly. The editor wasn’t designed for enterprise-scale operations; it was built for quick fixes and moderate catalog updates.
What It Does Well
The native bulk editor excels in specific situations:
- Quick price corrections: Fixing a handful of pricing errors takes seconds.
- Small inventory adjustments: Updating stock levels for a limited product range.
- Simple, infrequent edits: Occasional tweaks that don’t justify learning a new tool.
- Team training: Teaching staff the basics of variant management before introducing more powerful tools.
I find myself using the native editor for those “I just need to fix one thing” moments that pop up throughout the day. It’s always available, requires no setup, and handles simple tasks adequately. The problems only emerge when “one thing” becomes “one hundred things.”
Key Limitations
Several constraints make the native editor unsuitable for larger operations:
- No formula support: You can’t tell it to “increase all prices by 10%.” Each value must be calculated externally and entered manually.
- Limited undo functionality: Beyond a single level of undo, mistakes become permanent unless you restore from backups.
- Browser memory constraints: Large selections cause crashes or severe slowdowns.
- Basic filtering: Isolating specific variants for targeted edits requires workarounds.
- No saved views: You can’t save frequently-used column configurations or filter combinations.
- Pagination friction: Working across multiple pages of 50 products each disrupts flow and increases error risk.
The fundamental issue is that the native editor was designed as a convenience feature, not a power tool. It handles edge cases well but becomes a bottleneck for regular, large-scale catalog work.
Method 2: CSV Import/Export Workflows
CSV (comma-separated values) files offer unlimited editing power because you’re working in a full spreadsheet application like Google Sheets or Excel. Complex formulas, find-and-replace operations, and data manipulation become possible in ways the native editor doesn’t support.
When CSV Makes Sense
The CSV method fits specific scenarios well:
- One-off complex migrations: Moving data from another platform or restructuring your entire catalog.
- Offline work requirements: Editing during flights or in locations without reliable internet.
- Data cleanup projects: Standardizing SKU formats, fixing encoding issues, or reorganizing product information.
- Technical users comfortable with spreadsheets: If you know VLOOKUP from CONCATENATE, CSV gives you familiar tools.
Step-by-Step Process
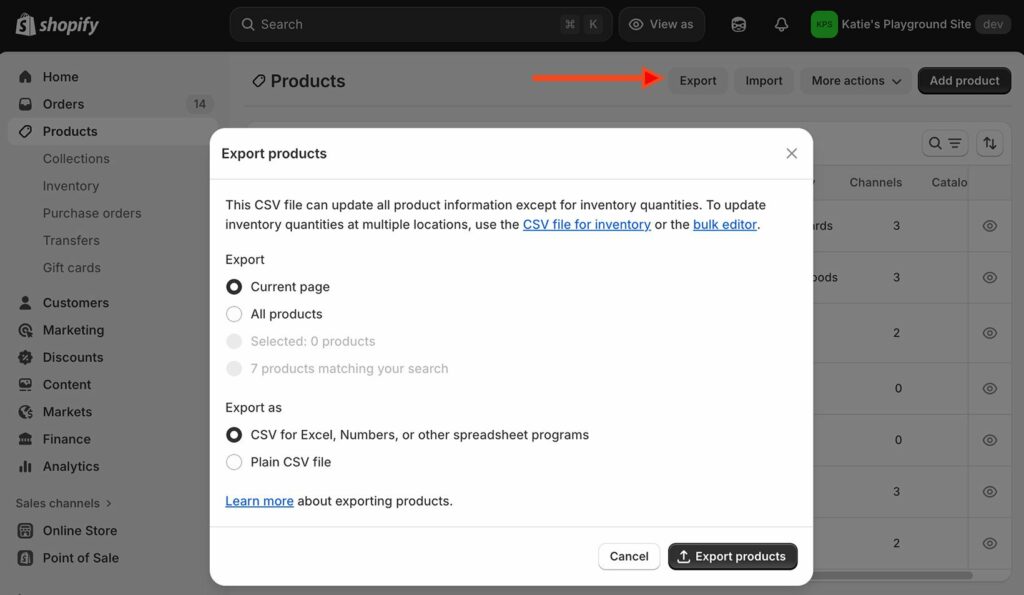
- Go to Products in your Shopify admin.
- Click Export and choose to export all products or a filtered selection as a CSV file.
- Open the downloaded file in Google Sheets (Shopify’s recommendation) or Excel.
- Locate variant rows in the spreadsheet. Each variant appears as its own row with the parent product’s handle repeated.
- Make your changes using spreadsheet formulas, find-and-replace, or direct cell editing.
- Save the file as a CSV, ensuring UTF-8 encoding is maintained.
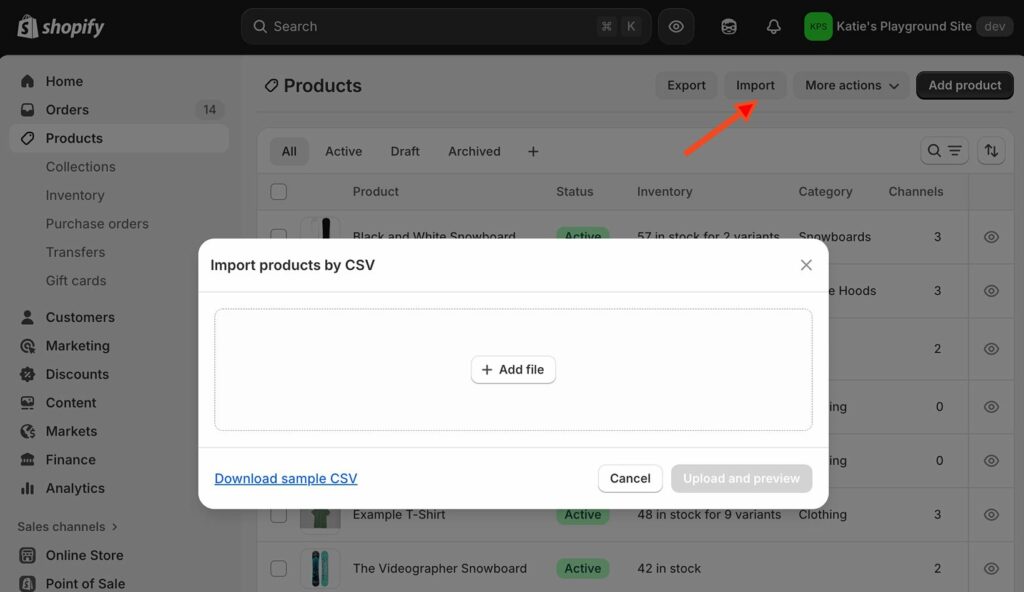
- Return to Shopify’s Products page and click Import.
- Upload your edited CSV and select the option to overwrite existing products with matching handles.
The Hidden Dangers
CSV editing carries significant risks that catch even experienced users. Our friends at Barn2 have written an excellent guide to bulk editing Shopify variants that explains many of these pitfalls in detail.
- Column header case sensitivity: Changing “Variant Price” to “Variant price” (lowercase p) tells Shopify to create a new custom field instead of updating existing prices. Your variants keep old prices while a useless field populates with your intended values.
- Encoding corruption: Non-UTF-8 encoding can mangle special characters, breaking product titles, descriptions, and SKUs containing accented letters or symbols.
- No rollback mechanism: Once imported, changes are live. There’s no “undo import” button. Fixing errors means either reimporting a corrected file or manually editing affected products.
- Formula residue: Accidentally leaving formula references instead of values in cells can cause import failures or incorrect data.
Best Practices for Safer CSV Work
If you choose the CSV path, these practices reduce (but don’t eliminate) risk:
- Always export fresh before editing: Start with current data to avoid overwriting changes made since your last export.
- Use Google Sheets: Shopify recommends it specifically because it handles encoding more reliably than Excel in some cases.
- Validate headers before import: Manually compare your edited file’s headers against the original export.
- Test with small batches first: Import a few products as a test before committing your entire catalog.
- Keep backup exports: Save a copy of the original export before making any changes.
Alternatively, you can find a way of bulk editing Shopify variants without messing around with CSV’s at all. We’ll look at how to do this next.
Method 3: Spreadsheet-Style Bulk Editing Apps
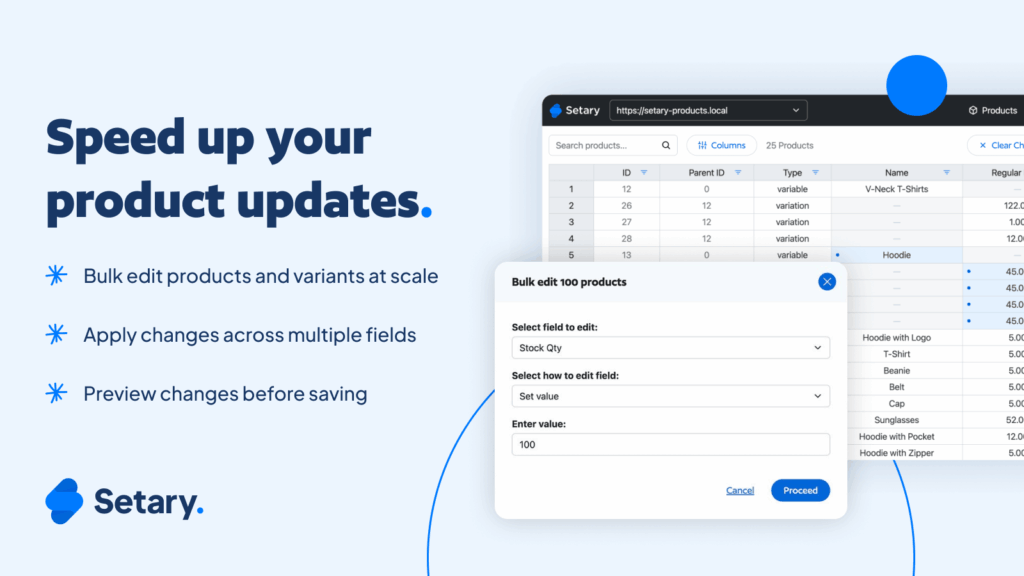
Spreadsheet-style apps combine the power of CSV editing with the safety of a live interface. Instead of the dangerous export-edit-import cycle, you work in a grid that connects directly to your Shopify store. Changes sync automatically without the header corruption and encoding disasters that plague CSV workflows.
Why This Approach Exists
The gap between the native editor’s limitations and CSV’s risks created demand for a middle ground. Merchants needed spreadsheet-level power (formulas, find-and-replace, bulk actions) without accepting spreadsheet-level risk (corrupted imports, no undo, hours of manual recovery).
Apps like Setary fill this gap by providing a familiar interface with critical safety nets built in.
Key Features That Boost Productivity
Modern spreadsheet-style bulk editors offer capabilities that dramatically accelerate variant management:
- Live sync: Changes save directly to Shopify. No export/import cycle means no column header disasters.
- Formula-driven bulk actions: “Increase all prices by 15%” becomes a one-click operation rather than thousands of manual calculations.
- Rollback and undo capabilities: Made a mistake? Revert changes with a click instead of spending hours manually fixing errors.
- Smart filtering and saved views: Isolate exactly the variants you need to edit. Save filter combinations for recurring tasks like “all out-of-stock clothing variants.”
- Inline metafield editing: Update custom variant data alongside standard fields in the same view.
- Multi-cell selection: Select ranges of cells and apply changes across all of them simultaneously.
Getting Started with Setary
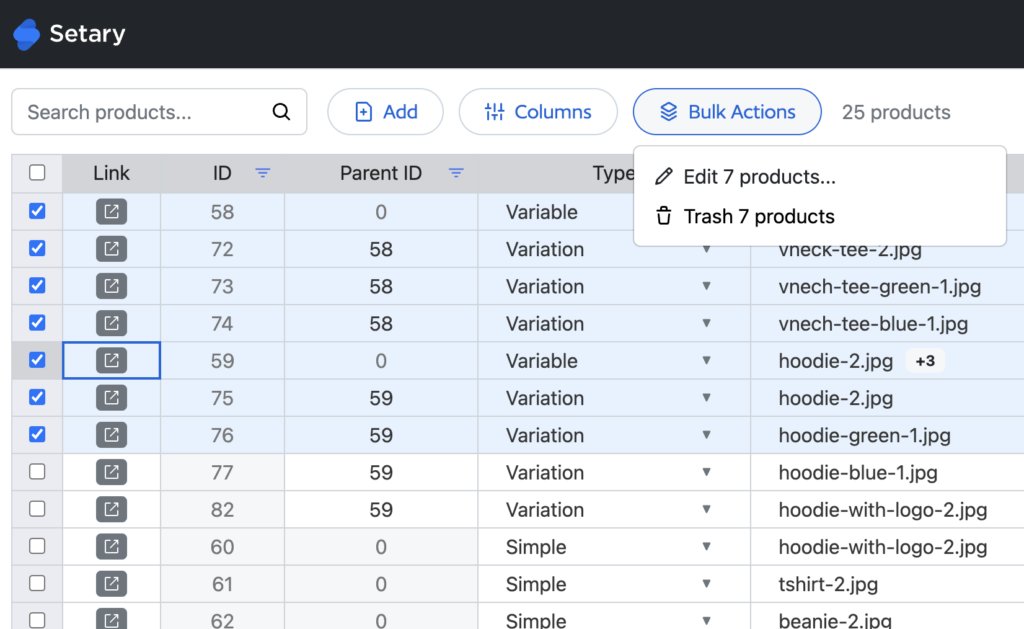
- Install and connect: Add Setary from the Shopify App Store. Your products and variants sync automatically.
- Configure your view: Use the column manager to display exactly the variant fields you need. Hide irrelevant columns to reduce visual clutter.
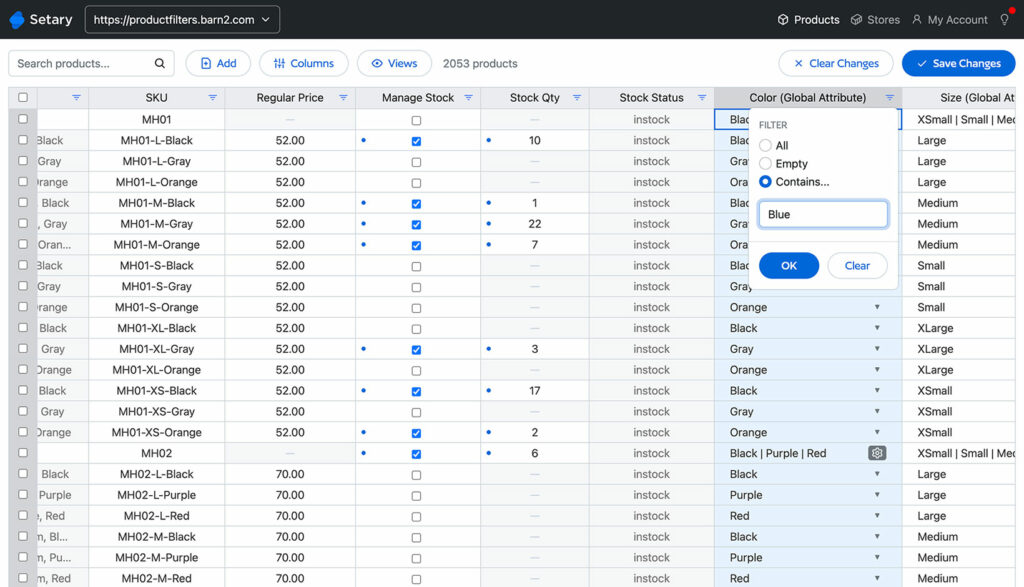
- Filter to your target variants: Use smart filters to isolate specific products, collections, stock statuses, or custom criteria.
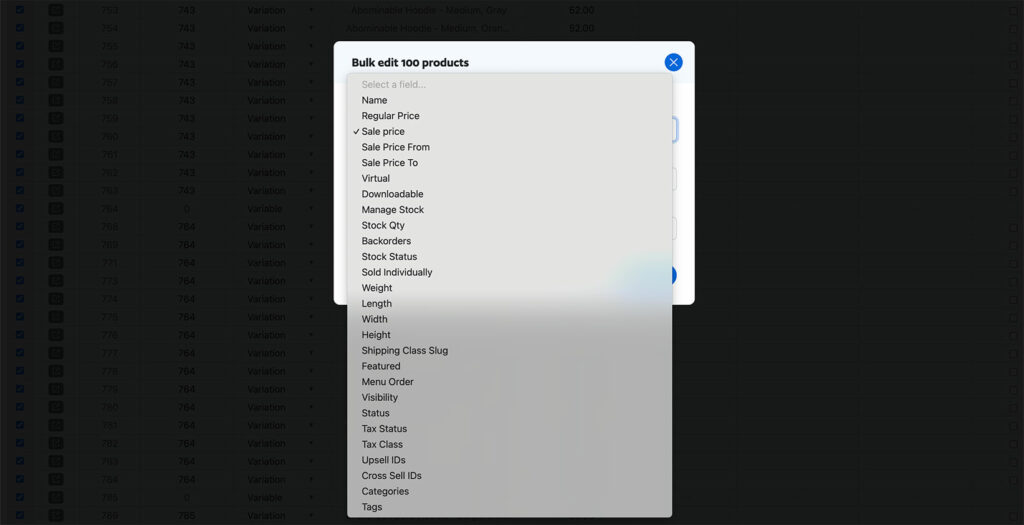
- Make your edits: Type directly into cells, use bulk actions for percentage changes, or apply find-and-replace operations.
- Review and save: Preview changes before committing. Setary syncs updates to Shopify in the background.
Productivity Workflows for Common Variant Tasks
Understanding methods is useful. Knowing exactly how to apply them to real scenarios is better. Here are workflows for the most common bulk variant editing situations.
Workflow 1: Applying Percentage Price Changes
Scenario: Your supplier increased costs by 12%. You need to raise prices across 2,500 variants to maintain margins.
Best approach: Spreadsheet-style app with bulk actions.
- Open your bulk editor and filter to the affected products (by vendor, collection, or tag).
- Verify your filter captured the correct variants by spot-checking a few products.
- Select all visible variants using the “select all” function.
- Choose the “Increase price by percentage” bulk action.
- Enter 12 and apply.
- Review the preview showing before/after values. Look for any unexpected results like prices that seem wrong.
- Confirm to apply changes across all selected variants.
Total time: approximately 5 minutes. The native editor would require calculating each new price externally and entering them one by one. CSV would work but risks the dangers outlined earlier.
A common follow-up task after percentage increases: rounding prices to clean numbers. Nobody wants to see $27.44 as a price. Many spreadsheet apps include rounding bulk actions that let you convert prices to .99 or .00 endings after applying percentage changes.
Workflow 2: Flash Sale Preparation
Scenario: You’re running a 48-hour sale with 25% off your summer collection (800 variants).
Best approach: Spreadsheet-style app with filtering and bulk actions.
- Filter to your summer collection.
- Export or note current prices (for restoration afterward). Many apps let you export a view to CSV as a backup.
- Select all variants and apply “Decrease price by 25%.”
- If you want clean sale prices, apply a rounding action to convert results to .99 or .00 endings.
- Verify changes and save.
- After the sale ends, use your saved prices or the “Increase by percentage” action (33.33% to restore original prices from 25% reduced).
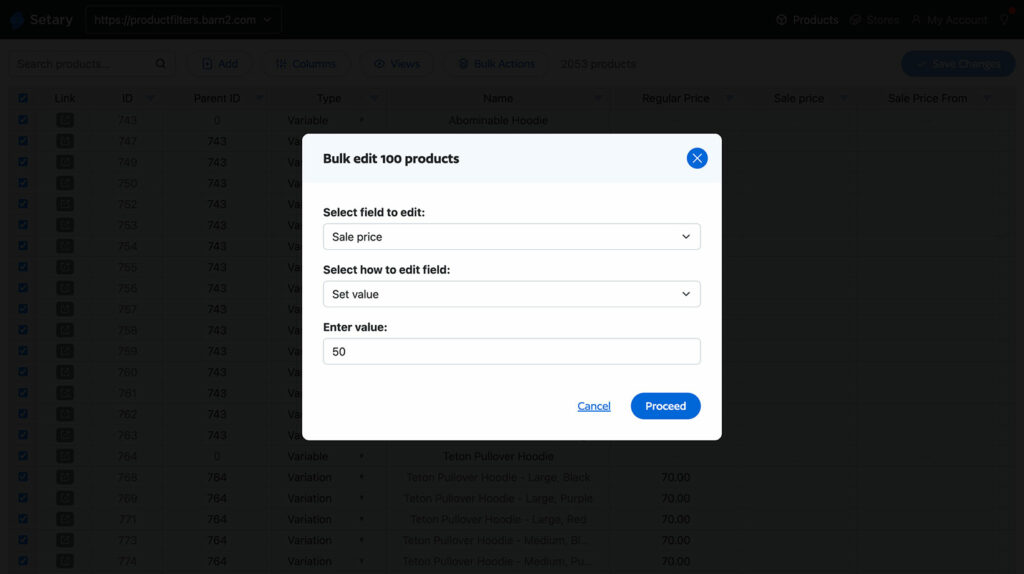
A critical note on sale price restoration: decreasing by 25% and then increasing by 25% doesn’t return you to the original price. If you started at $100, a 25% decrease brings you to $75. A 25% increase on $75 gives you $93.75, not $100. To reverse a 25% discount, you need to increase by 33.33%. This math trips up many merchants, so either save your original prices explicitly or use the correct restoration percentage.
Alternatively, some apps support scheduling changes, allowing you to set both the discount and restoration automatically. This removes the need to remember to revert prices manually after the sale ends.
Workflow 3: Inventory Reconciliation
Scenario: After a physical stock count, you have a spreadsheet showing actual quantities for 600 variants.
Best approach: Depends on your data format.
If your stock count data is already in a spreadsheet:
- Open your bulk editor.
- Filter to show only in-stock variants or the relevant product categories.
- Use copy-paste or find-and-match functions to update quantities from your count data (or save even more time using the ‘Bulk Actions’ button.
- Review discrepancies and save.
For stores using barcode scanners that output CSV, the CSV import method can work if you’re careful with header matching.
Workflow 4: SKU Standardization
Scenario: You’re implementing a new SKU naming convention and need to bulk edit SKUs in Shopify across 3,000 variants.
Best approach: Spreadsheet-style app with find-and-replace or CSV if you need complex transformations.
- Define your new SKU format (e.g., BRAND-CATEGORY-SIZE-COLOR).
- Use find-and-replace to standardize common elements.
- For complex transformations requiring concatenation formulas, CSV editing in Google Sheets might be necessary.
- Test thoroughly before applying to your entire catalog.
Workflow 5: Metafield Population
Scenario: You need to add fabric composition data to 5,000 clothing variants.
Best approach: Spreadsheet-style app with metafield support.
- Ensure your metafield definitions exist in Shopify’s settings.
- Open your bulk editor and add the metafield column to your view.
- Filter by product type or category to group similar items.
- Enter metafield values directly or use bulk actions to apply common values to selected variants.
- Save changes.
The native editor has limited metafield support, and CSV handling of metafields requires careful column formatting that’s easy to get wrong.
Building Your Bulk Edit Strategy
The right bulk editing approach depends on your catalog size, technical comfort, and how frequently you need to make bulk changes.
Match Method to Task
| Task Type | Recommended Method |
|---|---|
| Quick fixes on <100 variants | Native editor |
| Price changes on 100-500 variants | Native editor or spreadsheet app |
| Price changes on 500+ variants | Spreadsheet app |
| Percentage-based bulk pricing | Spreadsheet app |
| Complex data transformations | CSV (with caution) |
| Metafield updates | Spreadsheet app |
| Regular recurring updates | Spreadsheet app with saved views |
| One-time migration | CSV |
Ongoing Efficiency Tips
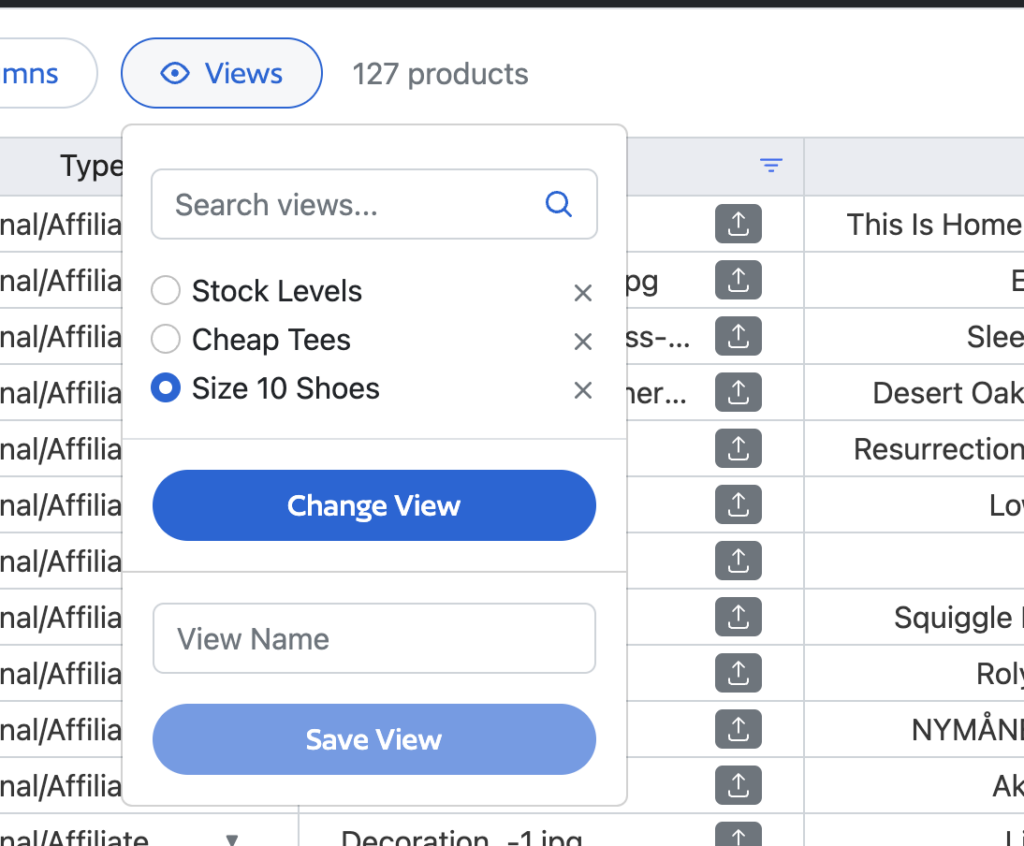
- Save filtered views for recurring tasks: If you regularly update prices for specific vendors or collections, save those filter combinations. Accessing them takes one click instead of rebuilding filters each time.
- Schedule bulk edits during low-traffic hours: While Shopify handles concurrent operations well, running large updates during peak shopping times adds unnecessary risk. Early morning or late evening updates mean fewer customers see partially-applied changes.
- Document your workflows: If you work with a team, create simple guides for common bulk editing tasks for both products and variants. Consistent processes reduce errors and training time.
- Test before committing: Whenever possible, preview changes before applying them. Even a quick visual review catches obvious mistakes like decimal point errors or wrong variant selections.
- Build a pre-launch checklist: Before running any major bulk edit of your variants, confirm you’ve backed up data, verified your filters, and have a plan for reverting if needed. This simple discipline prevents most catastrophic errors.
- Track what you change: Keep a simple log of bulk variant edits you perform, including dates, scope, and the method used. This audit trail helps diagnose issues if problems surface later.
Take Control of Your Variant Management
If your products have lots of options then the ability to efficiently bulk edit variants in Shopify can make a huge difference to your store management. The methods available range from Shopify’s free native tools to specialized apps that provide spreadsheet-level control with enterprise-grade safety.
For quick edits on small batches, the native editor handles the job adequately. For complex one-off projects where you’re comfortable with risk, CSV workflows unlock unlimited manipulation power. For everything in between – and especially for growing stores with recurring bulk editing needs – spreadsheet-style apps offer the best balance of capability and confidence.
Setary’s Shopify bulk editor gives you the spreadsheet power you need without the CSV dangers you don’t. Formula-driven price updates, smart filtering, rollback capability, and a live interface that syncs directly with your store. Whether you’re managing 500 variants or 50,000, the right tool transforms catalog management from a dreaded chore into a quick task.
Start your free trial with Setary and experience the difference that efficient bulk editing can make for your Shopify store.
Bulk edit anything in WordPress, WooCommerce and Shopify
Try our demo now and discover how you could save thousands of hours managing your site.
or try the demo