
There are four ways to bulk edit products in Shopify, and most stores only need the ones that are free. I’ll go through all four and explain when to use each one.
To bulk edit products in Shopify you can use the built-in bulk editor in your admin, export a CSV and re-import it, install a third-party app, or write against the Admin API. Which one suits you comes down to how many products you have and how often you change them.
Shopify’s product list shows 50 per page, so editing a 400-product catalog by hand means working through eight pages of products one field at a time. A CSV or a bulk edit app works differently: You set the new price once, then apply it to all 400 products in one go.
Here are the four methods, in the order I cover them:
- Shopify’s built-in bulk editor. Free, already in your admin, and fine for small changes.
- A CSV export and re-import. Also free, and the right choice for a migration or a supplier price list.
- A third-party app. I compare the six main ones, from $9 a month.
- The Admin API. For developers and real migrations.
You might be updating inventory levels after a stock take, setting sale prices across hundreds of products, or adding meta descriptions you never got round to. The method that suits you depends on how many products you have and how often you change them.
Do You Need an App at All?
Maybe not. To help you decide, answer these three questions.
- Editing fewer than 50 products on an occasional basis? Use Shopify’s built-in bulk editor. It’s free, it’s already in your admin, and it handles price, SKU, inventory and tags perfectly well.
- Doing a one-off migration, or loading a supplier price list? Use a CSV. Also free, and a spreadsheet works well if you only need to do this once.
- Changing products every week, or working with more than a few hundred? Buy an app. You will spend more than $10 of your own time working through pages of products and fixing failed imports.
If you’re in the third group, the table below is for you. Everyone else can skip straight to Method 1 or Method 2.
The Six Main Shopify Bulk Edit Apps Compared
I compared the best bulk editing apps on four things: Whether you edit in a live spreadsheet or fill in a task form, the cheapest plan that removes the product cap, whether you can roll a change back after it goes live, and what each one covers beyond products. Prices and review counts come from each App Store listing, and they change often, so check before you buy.
| App | How you edit | From | Cap on that plan | Rating | Rollback after sync | Scheduling |
|---|---|---|---|---|---|---|
| QuickEdit | Task forms | $9 | 500 products | 4.9 (104) | Yes | Yes |
| Setary | Live spreadsheet | $9.99 per store | No cap | No reviews yet | No | No |
| Hextom | Task forms | $9.99 | 500 per task | 4.9 (1,157) | Yes, 30 to 180 days | Yes |
| Mixtable | Live spreadsheet | $15 | Tied to your Shopify plan | 4.6 (36) | Not stated | No |
| Matrixify | File export and import | $20, covers two stores | 5,000 per file | 4.9 (1,686) | Yes | Yes, all plans |
| Ablestar | Task forms | $30 | No cap | 4.9 (918) | Yes, 60 to 180 days | Yes, from $60 |
I’ve written up each app further down, under Method 3.
Method 1: Shopify’s Native Bulk Editor
What It Is and When to Use It
Shopify’s native bulk editor is a built-in feature that modifies multiple products through a basic spreadsheet interface. Every Shopify plan includes this tool at no extra cost.
The native editor works best for updates affecting fewer than 50 products. It lets you handle quick changes without additional apps or setup. The interface loads in your Shopify admin panel with a familiar grid layout.
How to Bulk Edit Products in Shopify’s Native Editor
Shopify’s native bulk editor follows a straightforward workflow:
- First, navigate to your Products page in the Shopify admin. This displays your full product catalog with filtering options at the top.
- Select products using checkboxes next to each item you want to edit. You can select products manually or use filters to narrow the list first. Filters help when editing specific collections, vendors, or product types.
- Click the ‘Bulk edit’ button that appears at the top of the page after selecting products. This opens the bulk editing interface with your selected items.
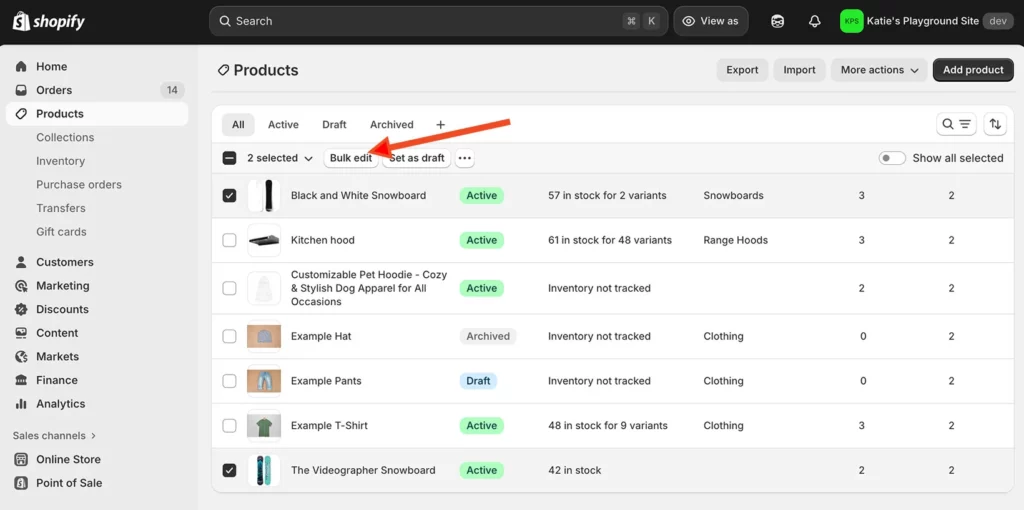
Bulk edit actions
Once you’re in, you can customize columns by clicking the ‘Columns’ button. Choose the product fields you want to edit. You can pick price, compare-at price, SKU, inventory quantity, tags, vendor or SEO settings. Only enabled columns appear in the editing grid.
You can make inline edits directly in cells by clicking and typing. The interface supports familiar spreadsheet shortcuts. For example, press Tab to move between cells, use Ctrl+Z to undo changes, or drag the corner of a cell to fill values down to other products.

Apply changes across multiple products by selecting cells and pasting values, or dragging fill handles to copy data. This works well for applying the same tag to all selected products or setting identical compare-at prices.
Save changes when you finish editing. To do this, click the ‘Save’ button to apply modifications to your live store. A progress indicator shows while Shopify processes your updates.
Your product list pages at 50 by default, and the bulk editor shows you the page you selected from. So if you want to change more than a page of products, you save, move to the next page and carry on. Shopify documents one hard limit here: On a mobile device you can only select 25 items at a time.
Advantages of Native Bulk Editing
The native Shopify bulk edit tool offers several benefits that make it the right choice for certain scenarios:
- Free on all Shopify plans means every merchant can access bulk editing without additional subscription costs. Whether you run a Basic plan or Shopify Plus, the feature works identically.
- No learning curve for spreadsheet users since the interface mimics Excel and Google Sheets. Your team already knows how to navigate grids, edit cells, and use keyboard shortcuts. Training time is minimal or nonexistent.
- Instant changes to your live store happen when you click Save. There’s no export-import cycle or processing delay. Updates appear on your storefront immediately, which works well for time-sensitive changes.
- It works well for prices, tags, and basic fields that don’t require complex transformations or formulas. Simple updates like changing all prices in a collection or adding a seasonal tag happen quickly.
Limitations You Should Know
The native Shopify bulk editor has several constraints that make it unsuitable for larger operations or frequent updates:
- Pagination makes big updates tedious. You edit a page of products, save, move to the next page and repeat.
- You cannot edit variant details in the same view as parent products. Variants require separate bulk editing sessions, making products with multiple size or color options harder to manage comprehensively.
- No undo button means that changes apply immediately and permanently to your live store. A mistaken edit goes live instantly. You’ll need to manually revert errors or restore from backups. I find this particularly nerve-wracking when making price changes.
- Browser performance issues with large selections slow everything down. Even with just 100 products selected, I’ve experienced sluggish cell responses and occasional browser freezes. The interface simply wasn’t designed for processing large datasets.
- Missing advanced features like percentage-based price changes, find-and-replace operations, or formula support. You can’t tell the native editor to “increase all prices by 15%” – you’d need to calculate new prices externally, then paste them in.
These limitations push many Shopify merchants toward alternative methods when their stores grow beyond simple bulk editing needs. I’ll cover these next. First the CSV method, which is free but fiddly, and then the Shopify bulk edit apps like Setary.
The bulk editor also works on collections, inventory and customers, not only products. Shopify has removed it for blog posts, pages and URL redirects, so you can’t use it for those any more.
One more quirk is worth knowing. In Microsoft Edge, long selections can fail because of a URL length limit, so use a different browser for big edits. See Shopify’s own documentation for the current details.
Method 2: Bulk Editing with CSV Files
When CSV Imports Make Sense
CSV files are comma-separated value spreadsheets that store data in plain text. Shopify lets you export product data to CSV files for editing in spreadsheet software, then import them back.
This method suits specific scenarios, such as one-time massive catalog overhauls, platform migrations, and supplier data integration. CSV files provide flexibility for complex changes requiring formulas, as you get the full capabilities of spreadsheet software like Excel, Mac Numbers, or Google Sheets.
Complete CSV Bulk Edit Workflow
The CSV process involves three distinct phases: Export, edit and import. You need to go through each of these every time you want to bulk edit product data in Shopify. (If that’s too much of a pain, then skip to Method 3, which is much quicker.)
Step One: Export Your Products
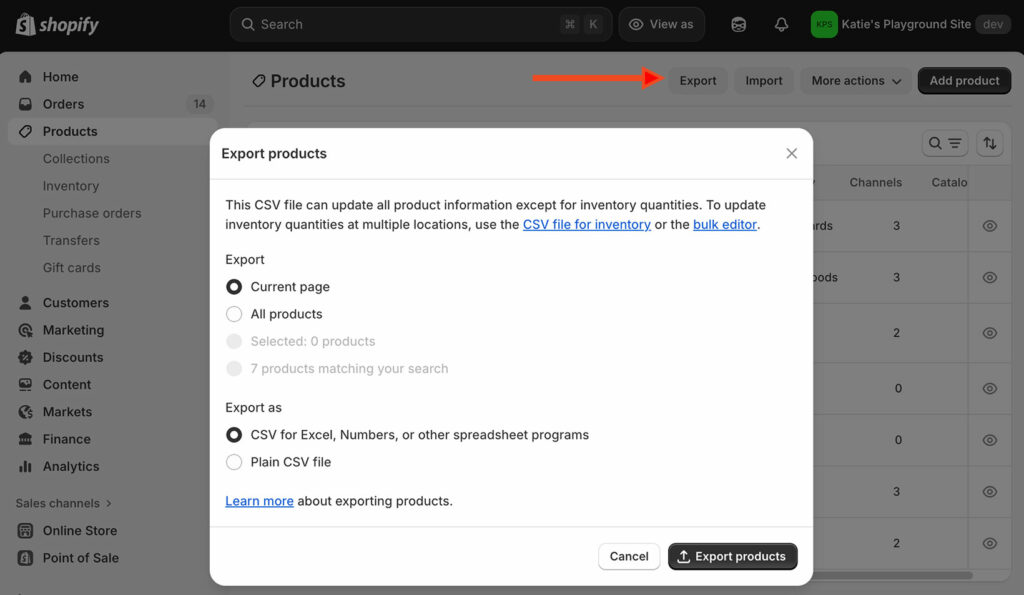
- Go to your Products page in Shopify admin and click the ‘Export’ button in the upper right.
- Choose which products to include: All products, products from one collection, or products matching your current filters. This selection determines what appears in your CSV file.
- Select ‘Plain CSV file’ format from the export options. This creates a standard CSV compatible with all spreadsheet programs.
- Click ‘Export products’ to generate the file. Shopify processes the export and emails you a download link. Large catalogs may take several minutes to process.
Step Two: Edit the Spreadsheet
- Open the CSV file once it’s downloaded. Use Excel, Google Sheets, Numbers, or any spreadsheet program. The file contains columns for every product field Shopify tracks.
- Key columns you’ll see include Handle (unique product identifier), Title, Body HTML (description), Vendor, Type, Product Tags, Published, Price, Compare At Price, SKU, Barcode, Inventory Quantity, and many more. Each row represents either a product or a variant.
- The Handle column is critical. This unique identifier tells Shopify which product to update during import. Never change Handle values unless you’re creating new products. Modifying handles creates duplicates instead of updating existing items.
- Make your edits carefully. Remove currency symbols from prices (write 29.99 not $29.99). Use whole numbers for inventory quantities. Maintain consistent formatting across all entries. Empty cells may clear existing data during import depending on your import settings.
Pay special attention to variant relationships. Shopify products with multiple variants appear across multiple rows. All rows sharing the same Handle belong to one product. The first row contains product-level data, while subsequent rows contain variant-specific information.
Save your edited file in CSV format. Some spreadsheet programs ask you to confirm the CSV format and warn about lost formatting. Confirm the save, because Shopify only needs the plain text data.
Step Three: Import the Updated Spreadsheet
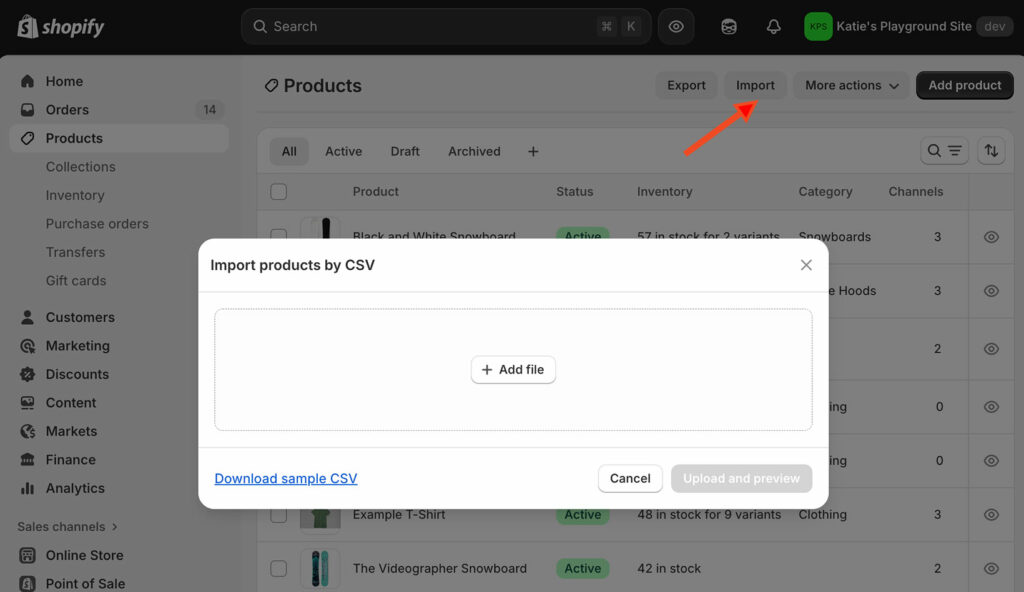
- Return to your Products page in the Shopify admin and click ‘Import’ in the top right.
- Upload your edited CSV file using the file selector. Shopify validates the file structure before proceeding.
- Check the ‘Overwrite any current products that have the same handle’ option. This crucial setting tells Shopify to update existing products rather than creating duplicates. Without this checkbox, Shopify treats every row as a new product.
- Click ‘Upload and continue’ to start processing. Shopify shows a summary of the changes it will make: Products to create, products to update, and any errors it found in your file.
- Review this summary carefully. It’s your last chance to catch mistakes before changes go live. If something looks wrong, cancel the import and fix your CSV file.
- Confirm the import to proceed. Shopify processes changes in the background and emails you when complete. Large imports may take 10-15 minutes depending on catalog size and Shopify’s current server load.
CSV Method Benefits
CSV imports provide plenty of capabilities that Shopify’s native bulk editor cannot match. They let you:
- Edit unlimited products in one import without pagination limits. Update 5,000 products as easily as 50 products. The only constraint is the 15 MB file size limit, and a product CSV is rarely anywhere near that.
- Work offline in familiar tools using the spreadsheet software you already know. No internet connection required while editing. Make changes during downtime, then upload when ready.
- Apply complex spreadsheet formulas to calculate new prices, generate SKUs algorithmically, or manipulate text fields. If you can build it in Excel, you can apply it to your Shopify products.
- Create complete catalog backups as a byproduct of the export process. I keep timestamped CSV exports before major changes, creating a safety net for recovery if needed.
- Edit any field including metafields and advanced product data – far more than you can in the native bulk editor. The CSV contains every piece of information Shopify stores about your products. You can bulk edit fields that don’t even appear in the native bulk editor.
Major CSV Risks and Drawbacks
The flexibility of CSV editing comes with significant dangers:
- High error risk causes imports to fail or corrupt data. One misplaced comma breaks CSV parsing.
- No validation means you won’t know about problems until after import completes.
- Cannot undo imports once they finish. You need a backup CSV to reverse changes.
- The time-consuming 3-step cycle adds friction with export-edit-import workflows.
- Complex for non-technical users who lack spreadsheet experience.
Why Experienced Merchants Avoid CSV
Most Shopify merchants have a CSV horror story. They’ll use it once for migration, then look for better tools. The lack of preview and undo makes CSV editing too risky for regular use. So the next section covers Method 3, which is the fastest way to bulk edit products in Shopify.
The CSV Mistakes That Cost People Their Data
Shopify documents several ways a product import can go wrong, and most guides don’t mention them. These are the ones I’d watch:
- Your product CSV can’t exceed 15 MB.
- Editing the Option value columns deletes your existing variant IDs and creates new ones.
- Sorting the file in Excel or Numbers can break the image links, and you lose your product images.
- Including a SKU column without the Option name and value columns deletes the variant option.
- You can’t cancel an import once it starts, and there’s no import history to check afterwards.
There is one more difference, and it catches a lot of people out. A blank cell overwrites the existing value with nothing, so a column you cleared wipes that field across every product in the file. However, a column you leave out of the file completely is left alone. So deleting a column from your file is safe. Clearing the cells in a column is not.
Method 3: Specialized Bulk Edit Apps
The Six Main Apps in Detail
Setary
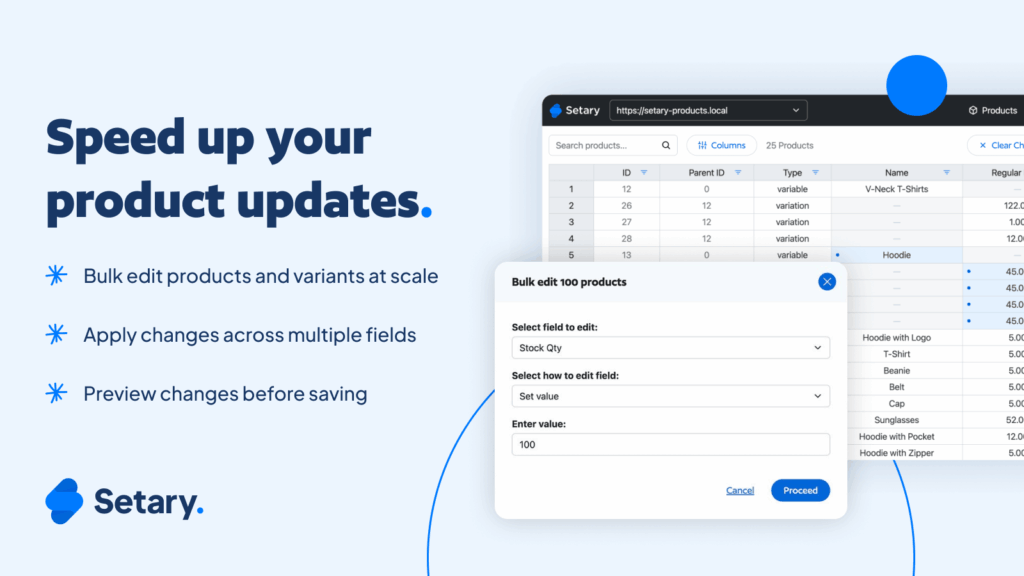
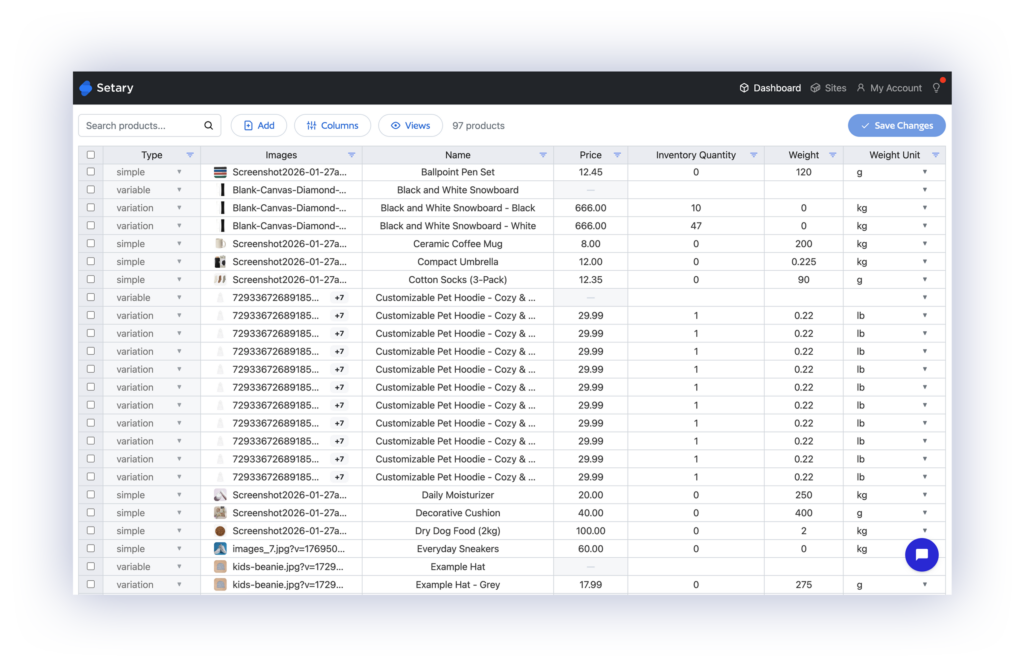
Setary is our own app, built with Barn2, so treat the rest of this section accordingly and check the others yourself. It loads your whole catalog into a spreadsheet grid that works like Excel or Google Sheets. You filter by any field, type into the cells, and commit when you are ready. It is $9.99 a month per store with no product cap, so a 20,000-product catalog costs the same as a 200-product one.
You can preview every change and undo it while it is still in the grid. However, there is no rollback once you sync your edits to the live store, and that is where Hextom, Ablestar and Matrixify have the advantage over it.
Setary shows your product metafields as spreadsheet columns, named after the metafield itself. It also handles variants in expanded rows, so you can edit a product and its variants without switching screens.
Setary launched on the App Store in June 2026, so it has no reviews yet. It runs at setary.com/app rather than inside your Shopify admin, which is why it has no Built for Shopify badge. There is no scheduling, and it edits products and variants only, so orders and customers are out.
Choose Setary if you edit products every week and you would rather work in a spreadsheet than fill in a form. Choose something else if you need scheduled sales, or if you work on orders as much as products.
Setary Doesn’t Store Your Product Data
This is worth understanding before you give any app access to your catalog. Setary uses the Shopify API to display your products live in the spreadsheet editor. When you approve your edits, it pushes them back to your store through the same API.
It doesn’t keep the changes, and it doesn’t keep your product data. There is no second copy of your catalog sitting in another company’s database. If you uninstall, none of your data is left behind.
Editing Several Shopify Stores From One Spreadsheet
If you run more than one Shopify store, you can connect them all to one Setary account. Sign up to Setary for Shopify from each store you want to edit, then link them together. They appear in the stores drop-down at the top right, and you switch between them without logging out or opening another tab.
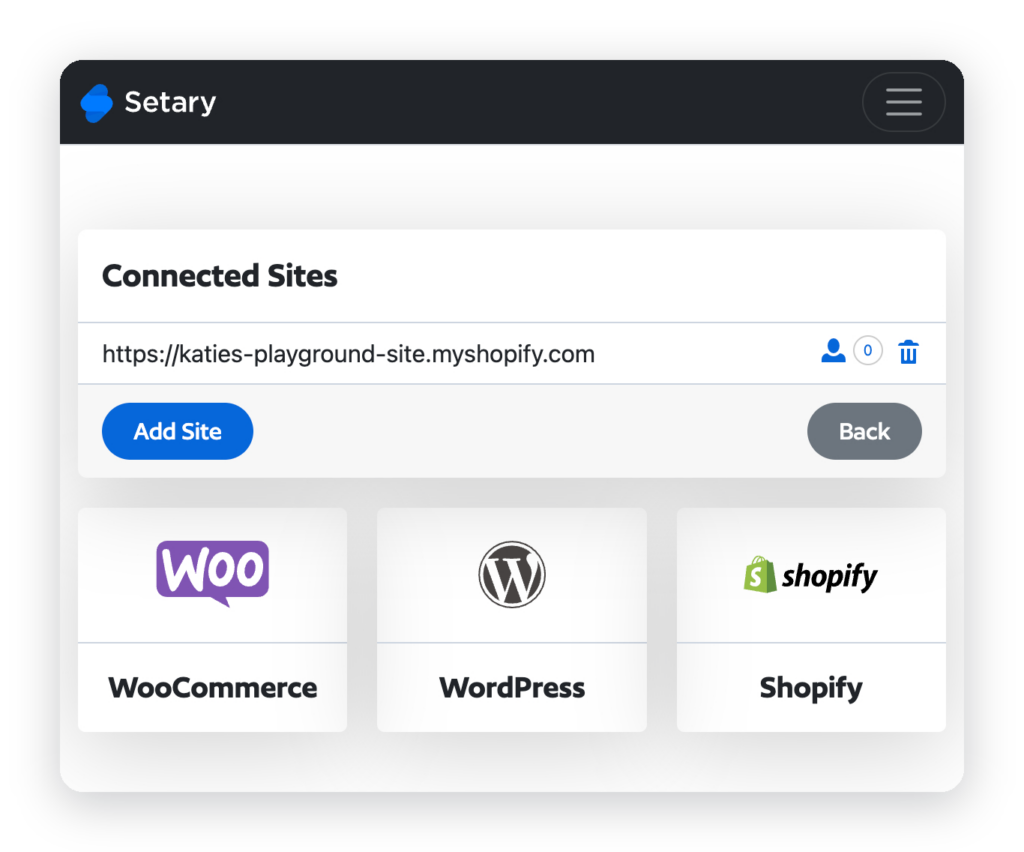
You can then apply the same change across several stores’ products from one grid. If you run regional storefronts, or you are an agency looking after several clients, you don’t have to make the same edit over again in each store.
On the cost: Each store installs the app and is billed separately through Shopify, so it’s $9.99 per connected store rather than one subscription covering all of them. Three stores is $29.97 a month. Shopify bills every app this way, so the same is true of the alternatives. Three stores on Ablestar is three installations at $30, which comes to $90.
One Tool for Shopify, WooCommerce and WordPress
Setary is the only app in this list that also edits WooCommerce and WordPress. It is the same app whichever platform your products come from, with the same spreadsheet, the same columns, the same filters and the same bulk actions.
As a result you learn one tool instead of two, and all three platforms sit in the same store switcher. If you’re an agency with some clients on Shopify and others on WooCommerce, that is one workflow across every client.
You can read more about bulk editing in WooCommerce if that side is new to you.
Ablestar Bulk Product Editor: Enterprise-Grade Automation
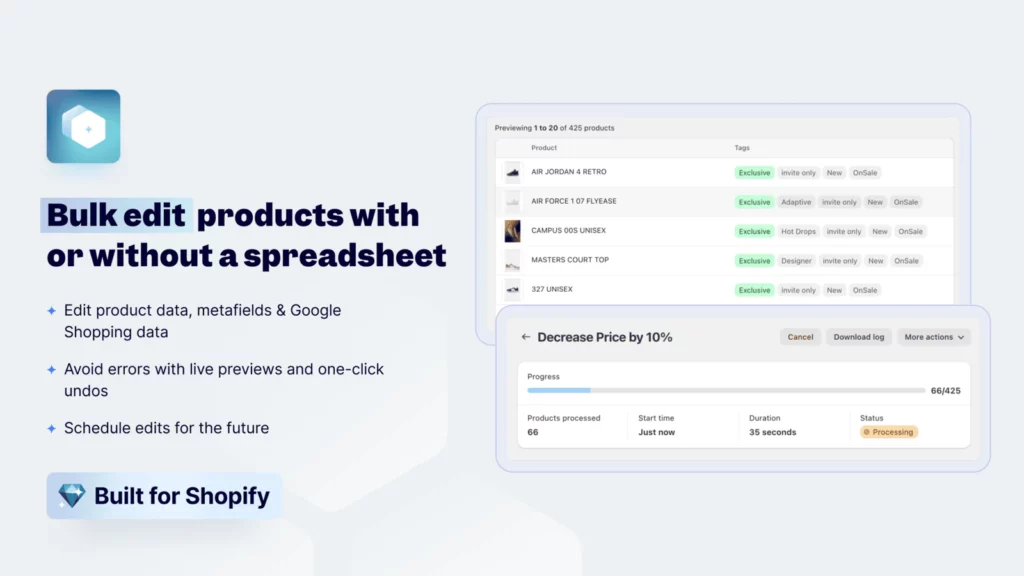
Ablestar processes bulk edits on their servers rather than in your browser. Because the work happens on their servers, a large catalog won’t freeze your browser.
The app excels at automation and scheduled editing. Set rules like “hide out-of-stock products every Monday morning” or “apply 20% discount to summer collection starting May 1st at midnight.” These run automatically without your involvement.
Ablestar’s preview mode shows pending changes in a safe sandbox environment. You see exactly what will update before applying changes to your live store. Progress monitoring displays real-time status while edits process, providing confidence that everything works correctly.
The undo functionality stores previous values for every modified field. Click the Undo button after a sale ends, and prices revert to pre-sale levels instantly. Made a mistake during bulk editing? Reverse the entire operation with one click.
There is a full Setary vs Ablestar comparison if you are choosing between those two.
Key Features
- Server-side processing handles large catalogs without browser limitations.
- Scheduled edits run automatically at specified times. Set up sales to start and end without manual intervention.
- Automated rules trigger based on conditions. “Hide products with zero inventory” or “tag products under $20” run automatically on schedule.
- Preview mode with progress monitoring shows what will change and tracks editing status in real-time.
- Undo functionality reverts entire bulk operations instantly.
- CSV upload support lets you prepare complex edits in spreadsheets, then upload for processing.
- Metafield editing extends bulk operations to custom product data.
- Google Shopping data management optimizes product feeds for Google Ads campaigns.
Ablestar costs $30 a month for uncapped edits per task, and $60 for scheduled and recurring edits. A free plan covers 10 products.
Hextom: Bulk Product Edit: The All-Purpose Tool
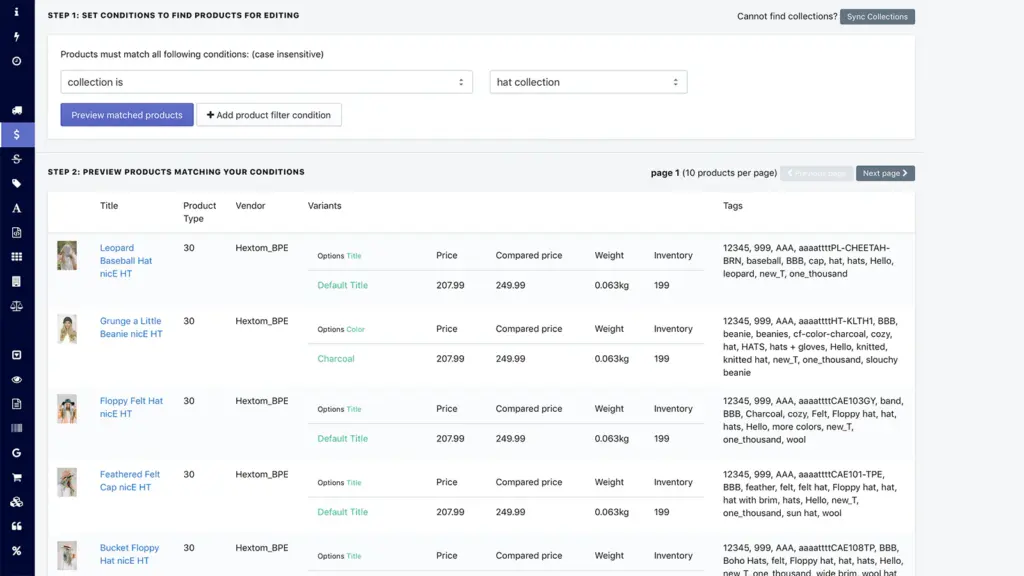
Hextom focuses on versatility and SEO optimization. The app extends beyond products to handle customers, orders, and other store data.
Hextom gives you more than one way to make a change. Use the in-app editor for straightforward updates or import CSV files for complex changes. Dynamic pricing rules apply conditional logic, like “reduce price by 10% if inventory exceeds 50 units.”
Hextom shines for SEO optimization. Bulk edit meta titles, meta descriptions, and URL handles across your catalog. Find-and-replace operations standardize text, fix common mistakes, or update branding consistently.
Key Features
- Bulk edit products, metafields, customers, and orders from one app. Versatility reduces the number of apps you need.
- Dynamic pricing rules apply conditional discounts based on inventory, vendor, or other criteria.
- SEO bulk editing optimizes meta titles, descriptions and URLs across your whole catalog, which improves search visibility.
- Task scheduling runs bulk edits at specified times. Schedule changes during low-traffic periods.
- Advanced import/export handles CSV files with flexible mapping and transformation options.
- Find-and-replace functionality cleans up text, standardizes formatting, or updates outdated information across products.
Hextom costs $9.99 a month, capped at 500 products per task. You need $19.99 for 5,000 per task and $49.99 for 50,000. The free demo plan handles 10 per task.
There is a full Setary vs Hextom comparison if you are choosing between those two.
Mixtable
Mixtable is the other live spreadsheet here, and it edits orders and customers as well as products. Pricing follows your own Shopify plan, from $15 to $49. Its rating is 4.6, the lowest of the six, though that comes from only 36 reviews, which isn’t much to go on either way. There is no scheduling, and Mixtable doesn’t publish a rollback window or a product cap, so you would need to ask before committing to a large catalog.
There is a full Setary vs Mixtable comparison if you are choosing between those two.
Matrixify
Matrixify has no editing grid at all. You export a file, change it in Excel or Google Sheets, then import it back. It handles 18 data types, including draft orders, metaobjects, B2B companies, payouts and translations, which Shopify’s own export won’t touch. That is the difference from the CSV method above.
For a real migration between platforms, Matrixify is the best of the six. For changing some prices on a Tuesday, it is overkill. One merchant review from August 2026 puts it bluntly: “Unless you are an XL guru this app is rubbish”. That’s one person’s view, and it does tell you who it suits.
Pricing starts at $20 for 5,000 items per file, and only the $200 Enterprise plan is unlimited. Every plan includes a free additional store, including the free Demo plan.
There is a full Setary vs Matrixify comparison if you are choosing between those two.
QuickEdit
QuickEdit is the cheapest of the six at $9 a month, with scheduling and a revert option from the start. Like Hextom, it caps the entry plan at 500 products per task, and you need the $39 Professional plan to remove the cap. It has 4.9 from 104 reviews, the smallest review count of the four established apps here, and it works through task forms rather than a grid, so it suits changes you set up and leave to run, rather than browsing your catalog.
Method 4: The Admin API and Scripts
The fourth option is to write code against Shopify’s Admin API. You’d use GraphQL bulk operations for large jobs, or Shopify Flow for rules that run on a trigger.
This is the right answer for a real migration, a recurring sync with a supplier feed, or logic no app exposes.
It needs a developer, so if you don’t have one it isn’t really an option. An app will get you to the same place for $10 a month. I’ve included it because the other three methods all have a limit and this one doesn’t.
Comparing the Four Methods
| Method | Cost | How many products | Undo | Best for |
|---|---|---|---|---|
| Native bulk editor | Free | A page at a time | No | Fewer than 50 products, occasional changes |
| CSV import and export | Free | Unlimited, 15 MB file | No | One-off migrations and supplier feeds |
| A bulk edit app | $9 to $200 a month | Depends on the plan | Usually yes | Regular changes and variant-heavy catalogs |
| Admin API | Developer time | Unlimited | Whatever you build | Migrations and recurring syncs |
Which Method for Which Change
| What you want to change | Easiest way |
|---|---|
| Prices across a collection | An app with percentage adjustments, or the native editor for a handful |
| Inventory levels | Products → Inventory in your admin |
| Tags | Native editor, or an app for find and replace |
| Product descriptions | CSV, or an app with find and replace |
| Variants | A spreadsheet app, because the native editor separates them from the parent product |
| Metafields | An app, or CSV |
| Collections | Native editor, or an app for conditions |
| SEO titles and meta descriptions | CSV, or a task-form app like Hextom |
| Google Shopping fields | Ablestar, or CSV |
| Vendor and product type | Native editor or any app |
| Deleting products in bulk | Your admin’s bulk actions, or an app |
Best Practices for Safe Bulk Editing
Always Create Backups First
Export product data before major changes. Give each file a dated name so you can tell them apart. Keep the last three backups for multiple recovery points.
Test with Small Batches First
Edit 5-10 products before editing 500. Check your storefront after the test to verify changes display correctly. This catches problems when they’re easy to fix.
Use Filters Carefully
Double-check filter criteria before applying changes. Review the product list to verify you’ve selected exactly what you intended. Apps with preview features provide extra safety.
Understand Variant Relationships
Know how variant changes affect parent products. Be careful with SKU changes since they may break integrations. Use apps that clearly show variant hierarchy.
Shopify Bulk Editing FAQs
How do I bulk edit more than 50 products in Shopify?
Your admin product list pages at 50, so the built-in editor works through your selection a page at a time. For a bigger change, either export a CSV and edit it in a spreadsheet, or use an app that loads your whole catalog at once. Shopify’s only documented hard limit is on mobile, where you can select 25 items at a time.
How do I bulk edit in Shopify?
Go to Products in your admin, tick the products you want to change, then click Bulk edit. Use the Columns button to choose which fields appear, type your changes into the cells and click Save.
How do I bulk edit alt text in Shopify?
The native bulk editor doesn’t cover image alt text. Export your products to CSV, edit the Image Alt Text column, and import the file back. Some apps also handle alt text directly.
How do I bulk edit weight on Shopify?
Weight is a variant field. Select your products, open the bulk editor, then add the Weight column from the Columns button. If you’re changing weight across hundreds of variants, a spreadsheet app or a CSV will be quicker.
How do I add products to Shopify in bulk?
Use a CSV import. Build a file with the required columns, set a unique handle for each product, then go to Products and click Import. Leave “Overwrite any current products that have the same handle” unticked if you only want to add new products.
What does bulk edit mean?
Bulk editing means changing a field across many products at once instead of opening each product and editing it by hand. For example, adding 10% to the price of every product in one collection is a single bulk edit rather than 200 separate ones.
Which Shopify Bulk Editor Should You Use?
If you have a small catalog and you change things now and then, Shopify’s built-in editor is all you need and it costs nothing. If you’re migrating a store or loading a supplier’s price list, use a CSV and keep a backup of the file you started with.
If you’re in your catalog every week, an app pays for itself quickly. Setary suits you if you want a spreadsheet and no product cap at $9.99 a month.
However, it won’t suit you if you need scheduled sales. For those, look at Ablestar or QuickEdit. If you edit orders and customers as often as products, Hextom covers more ground, and for a full platform migration you want Matrixify.
Whichever you pick, export your products to CSV before the first big change you make. Every method on this page can go wrong, and a backup turns a bad afternoon into a ten-minute fix.
Setary is free to try for seven days, then $9.99 a month per store with no limit on how many products you edit.
Bulk edit anything in WordPress, WooCommerce and Shopify
Try our demo now and discover how you could save thousands of hours managing your site.
or try the demo